
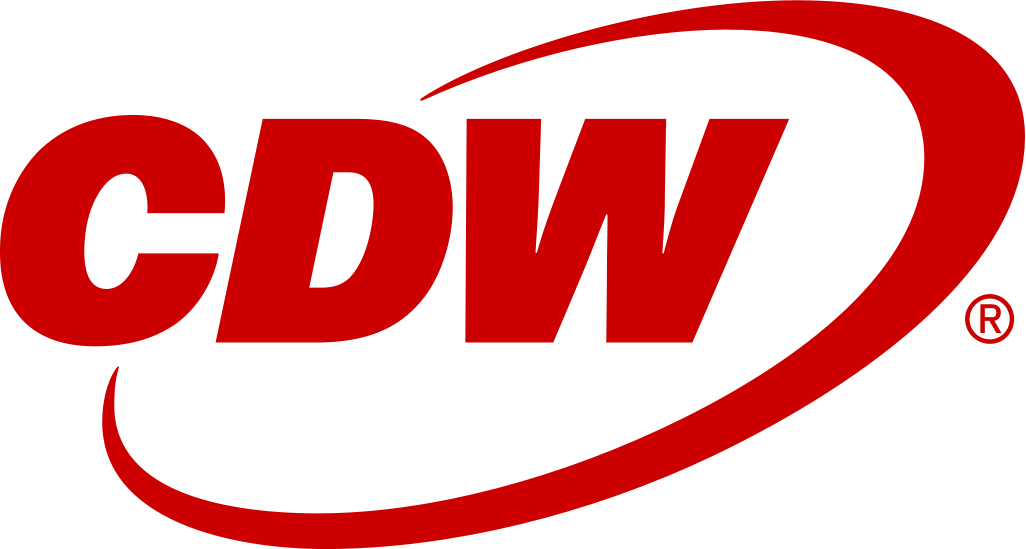
DYMO - print server - USB
$230.90
$209.99
Sign in for your price
Mfg # 1750630
CDW # 1667719

Know your gear
Share the benefits of the DYMO® LabelWriter® label printer on your office network with the LabelWriter® Print Server.
This easy-to-setup network device connects your DYMO LabelWriter 400 series label printer directly to your network, giving everyone access, right from their computer.
Windows® and Mac® network compatible, the LabelWriter Print Server comes with easy to follow instructions and all the software needed, so installation is simple and straightforward. Now everyone in the office can share the benefits of the DYMO® LabelWriter® label printer including:
• Quick and easy printing of professional looking labels, one-at-a-time
or in batches.
• Simple printing for many of your favorite programs like Word, Outlook®,
QuickBooks®, and CardScan® and more.
This easy-to-setup network device connects your DYMO LabelWriter 400 series label printer directly to your network, giving everyone access, right from their computer.
Windows® and Mac® network compatible, the LabelWriter Print Server comes with easy to follow instructions and all the software needed, so installation is simple and straightforward. Now everyone in the office can share the benefits of the DYMO® LabelWriter® label printer including:
• Quick and easy printing of professional looking labels, one-at-a-time
or in batches.
• Simple printing for many of your favorite programs like Word, Outlook®,
QuickBooks®, and CardScan® and more.
Add to Compare
Enhance your purchase
Dymo LabelWriter Print Server is rated
3.60 out of
5 by
8.
Rated 5 out of
5 by
RedJeep from
Shares the Twin Turbo easily
Sharing our Labelwriter Twin Turbo from a computer was always problematic when any changes to the sharing computer occurred. Also, the sharing computer always had to be powered on for the printer to be used by anyone else in the office. Setup and configuration of this LabelWriter Print Server was quick, easy and painless. I would highly recommend this for any office sharing a Labelwriter.
Date published: 2011-05-31T00:00:00-04:00
Rated 5 out of
5 by
ITGUY67 from
You CAN use this for larger networks. Connect via IP with a browser!
The application to set the print servers up from DYMO only allows for IP address and subnet to be added to the device.
However, if you log into the device via a browser and the IP address, you can then put in a gateway as well. You just have to get the DHCP address from the application in order to connect.
I saw a couple of comments posted here about not working with larger environments and thought I would let everyone know this.
All of ours went on the blink once for no reason. We had to factory reset them all. My hospital works with Athena and they primarily use DYMOs for their work flow.
This print server was one of the ways to network them all at our site.
Cheers!
Date published: 2016-11-01T00:00:00-04:00
Rated 5 out of
5 by
money waster from
junk
I bought this a while ago and it wouldn't run on a Mac. No advance warning on Amazon, Demo, etc. So now (3/20 I try to give it another go. The drivers need to be updated and I should contact the developer. There is something seriously wrong with this logic (or lack thereof).
Date published: 2020-02-20T00:00:00-05:00
Rated 5 out of
5 by
Cheyenne from
Works Well
We've needed something like this in our office for some time as we all have laptops and may not always be able to connect to the Dymo to allow it to be used. This makes our lives much easier! Set up was simple with the directions provided.
Date published: 2018-02-02T00:00:00-05:00
Rated 5 out of
5 by
motmin from
Horrible
A waste of my time and money. It was impossible to set up, horrible customer service. Trying to call tech support is a joke.
Date published: 2018-02-21T00:00:00-05:00
Rated 5 out of
5 by
jusgra98 from
Works as advertised
Just a note about setting the default gateway -- it can't be set from the application that installs from the CD but it can be set from the web interface.
Date published: 2013-09-25T00:00:00-04:00
Rated 5 out of
5 by
cbass from
Works as expected, in a home network environment
Once you get the print server on your network & connect your DYMO LabelWriter, it should be smooth sailing. It should go without saying, but be sure to have the DYMO Label Software (or DYMO Connect for Desktop already installed on any machine(s) you’ll be using the DYMO printer with.
I did want to point out a few things though. When you unbox the device, you'll find the MAC address listed on the bottom sticker. I would highly suggest creating a static IP for the print server via your router's management page (192.168.1.1 in my case), BEFORE connecting it to your network via Ethernet. Per the DYMO Print Server User Guide, by default, the static IP address for the print server is 192.168.1.100. Since that was already taken by another IP reservation on my network, I assigned 192.168.1.3 to my DYMO print server.
Once that was done, I connected the print server to my LabelWriter & to my router, and plugged in the A/C adapter. Less than a minute later, all of the status lights had activity & I was able to navigate to 192.168.1.3 to access the DYMO LabelWriter Print Server web configuration page. I really didn’t need to change any options here though, since setting the IP address is basically the bulk of the setup; I did modify the server Description field.
Do yourself a favor and search Google for “Dymo Print Server User Guide” — the first result is what you’re looking for — a PDF version of the setup guide. Avoid installing the Control Center software, as the same configuration can be done using the print server web UI (as outlined above). The only thing I used the guide for was to install the DYMO printer on my Windows machine(s), since the process was not as straightforward compared to Mac. Once on the network, the DYMO printer automatically shows up when you click on the + button on the Mac’s Printers & Scanners window — I just changed the Name & Location fields when adding it, for clarity. However, on Windows, the DYMO will not be automatically detected, and must be added manually, by following the steps listed under the “Adding a Printer in Windows Vista” section of the DYMO Print Server User Guide; the Vista instructions still work in Windows 10. This is where having a static IP comes in handy — you’ll be guaranteed that the DYMO Print Server will always have the same IP address, even after its DHCP lease expires. This ensures that your computers will always be able to “see” the printer on the network after it’s been added.
My server’s been up & running since day 1 with no issues; works with both my Mac & Windows machines. Docking 1 star, given the not-so-clear setup process, and the outrageous price. I’m mostly bummed about Windows not automatically detecting the print server during the install step, unlike Mac. But overall, it’s a set-it-and-forget-it kind of device.
TL;DR — Install the DYMO Label Software (or DYMO Connect for Desktop) on any machine(s) you’ll be using the DYMO printer with. Locate the MAC address of the DYMO LabelWriter Print Server (found on the bottom sticker of the device), and set a static IP address for the server on your network (doing this via your router, NOT the DYMO server itself, is preferable). Connect the DYMO LabelWriter Print Server to your DYMO printer via USB, to your router/modem via Ethernet, and connect the A/C adapter. Navigate to the DYMO LabelWriter Print Server web configuration page, using the IP address you just reserved — if it loads, it means it’s been set up correctly — you do not necessarily need to change any options here. By default, the Administrator is “admin” as is the Password; unless you’re on an Enterprise/office network, I wouldn’t suggest changing this. Follow the instructions in the Dymo Print Server User Guide to add/install the printer on your computer(s) — refer to “Adding a Printer in Windows Vista” if you’re using Windows 7 or 10.
Date published: 2020-06-06T00:00:00-04:00
Rated 5 out of
5 by
Josh3807 from
null
This server was extremely easy to set up and works without issue. Our users have always wanted a way they could all use the label printer without having to sit at a dedicated machine. Installed this, and now everyone in the area uses it.
Date published: 2014-08-04T00:00:00-04:00