How to Bypass the Microsoft 'Apply to Each' Power Automate Loop
Employ this workaround to speed up your user input in “apply to each” approval flows for Microsoft.
As the name implies, Microsoft Power Automate is a powerful tool that can be used to automate all sorts of processes inside your organization. Its value really begins to shine when paired with other Microsoft or third party products and features.
Generally, these workflows run quickly and efficiently, and tasks that would ordinarily require end users to complete a series of repetitive tasks can be run in seconds without user input. However, that model changes for certain actions that are designed to require end user review, feedback or approvals.
Some common examples are workflows leveraging the “Approvals” or the “send a card and wait for response” actions. In these instances, the workflow is designed to pause and wait for an end user’s review and response rather than running through the flow as quickly as possible.
Using the built-in Approvals app, which integrates directly into Exchange Online and Microsoft Teams, is a great option for collecting and tracking approvals for a wide range of workstreams. When paired with Power Automate automated cloud flows, this can be used to track multiple approvals for multiple parties by keeping each approval in its own instance of the flow.
In the example outlined above, completing an MS form kicks off an approval process based on the input of the form. Each of these two flows is waiting for its own approval to be completed, and each instance of the flow can be completed independently from each other.
The “Apply to Each” Problem
This all sounds pretty good if you can build a single approval process with multiple approvals pending at the same time. However, depending on how your flow is built, this may not always be true.
In the example outlined above, the flow that creates the approval is trigged each time a form is filled out, but what happens when we create approvals from another source, such as a SharePoint list? My first thought would be to create a flow that looks something like this:

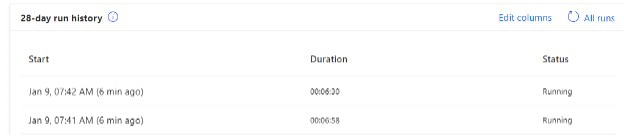
“Get items” should return two entries, so we would expect to see two approvals in a running state, just like we did with the form. However, when we take a look, we see that there is only one test running.
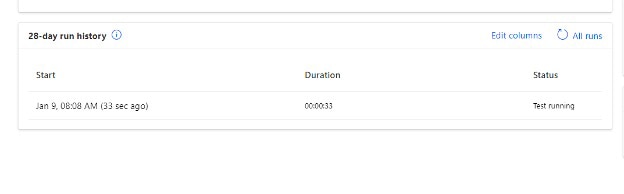
The reason for this is that the “apply to each” action only runs each request sequentially, and because this approval functions by waiting for a response, the second approval will never get sent until the first approval is complete. In many instances, I have found that the true objective is to send out two or more approvals at the same time and wait for each of those responses concurrently, rather than waiting for one approval at a time, which leads us to the fun part.
The Workaround
To get around this sequential “apply to each” loop, we can leverage some unique child flows. There are a lot of great resources online about how a child flow can be created and called, so I’ll skip over that to keep this a bit more concise. This workaround gets fairly layered, but our end state will be the following:
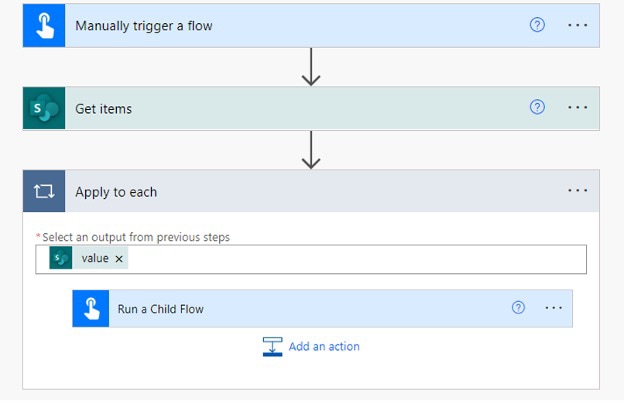
1. Parent workflow that triggers, gets the items from the list and runs an “apply to each” calling child flow (#2)
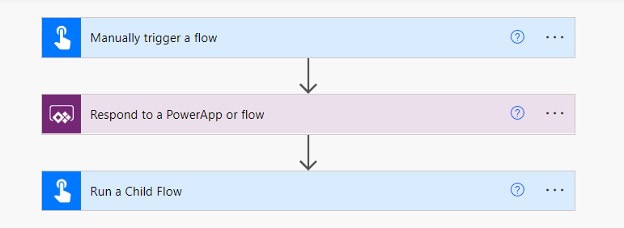
2. Child flow that functions as a “passthrough” flow, which responds to the parent workflow and calls another child flow (#3)
3. Child flow that uses shared input to start the approval process
Flow 1
The goal of this flow is to keep the same trigger and “Get Items” action you initially planned. Once you get to the “apply to each,” you will replace the “Approvals” action with the passthrough child flow (#2). It should look something like this:
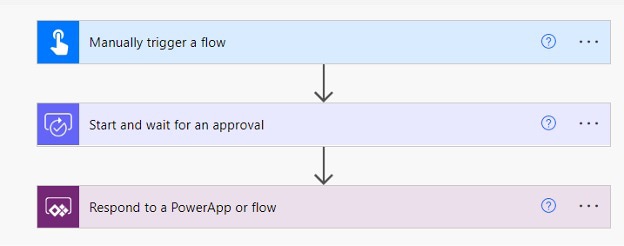
Flow 2
The objective of this flow is to take the “apply to each” input from flow #1 and pass that input along to flow #3, breaking the “in sequence” behavior of the “apply to each” action. The order of this flow is important because the “Respond to a Power App or Flow” action must take place before the “Run a Child Flow” action. The reason we have it laid out in this order is because you must tell flow #1 that the child flow is complete so it can immediately start the next instance of the “apply to each” loop.
Flow 3
Finally, we can get around to editing and sending out our approval. It’s during this step that any customizations to the approval can be made.
Power Automate’s “apply to each” action is a very powerful tool in building flows in the platform. However, it does have some impactful limitations when a flow needs to wait for user input. This workaround is an effective way to avoid these limitations and process actions much more quickly.
Story by Ryan Bandel, a Technical Architect focused on Microsoft productivity on the Services R&D team at CDW.
Ryan Bandel
Technical Architect