How to Setup a Highly Available Website in AWS
NGINX and other tools help simplify this process.

Arun Daniel

Have you ever woken from a deep sleep and suddenly been in the mood to setup a highly available, load-balanced website using NGINX, while having the webpages pulled securely from an S3 bucket that also happens to hold your NGINX logs? Me neither; however, I was asking for a friend. Surely, there are some very focused and dedicated IT professionals that have felt this urge though.
In this post, I will cover exactly the above scenario and will provide steps on:
- How to create an S3 bucket
- Upload website related files to that S3 bucket
- Allow only EC2 instances to access the S3 bucket
- Create these EC2 instances
- Create a load balancer that is the front end to the EC2 instances
Discover how CDW services and solutions can help you with AWS.
Creating the S3 Bucket
Think of the S3 bucket as the movie production craft services table, with all the good foods, sitting in a Hollywood backlot party room that is very exclusive, where only the EC2 instances are on the guest list. To further isolate these guests, a security entourage has been hired to act as the first level of contact by anyone that is not invited to the party but wants the attention of the guests.
Although there are various ways to do the same work using other workflows (S3 static website), this post will touch upon multiple services on AWS.
Prerequisites
Since you will be running this example in AWS and you want the rinse and repeatability, you will need:
- An AWS account that has programmatic access since you will be using Terraform
- Terraform (surprise, surprise)
- An AWS IAM user with the correct permissions to create S3 buckets, create VPC and related objects, create EC2 instances, create roles/policies, and create load balancers
- Files for our website
AWS Objects
At the end of this run, you will have Terraform code that will create in AWS:
- One VPC
- Two public subnets in two different Availability Zones
- An application load balancer
- A target group for our load balancer
- Two EC2 instances
- A S3 bucket that will contain website files for the EC2 instances to pull, as well as a place to drop logs from the EC2 instances for long-term retention and analysis
- An EC2 role with the necessary policies to read from S3 and write to S3
- All objects with consistent tags
Terraform
Tree View: Here is how my tree view looks for my Terraform project.
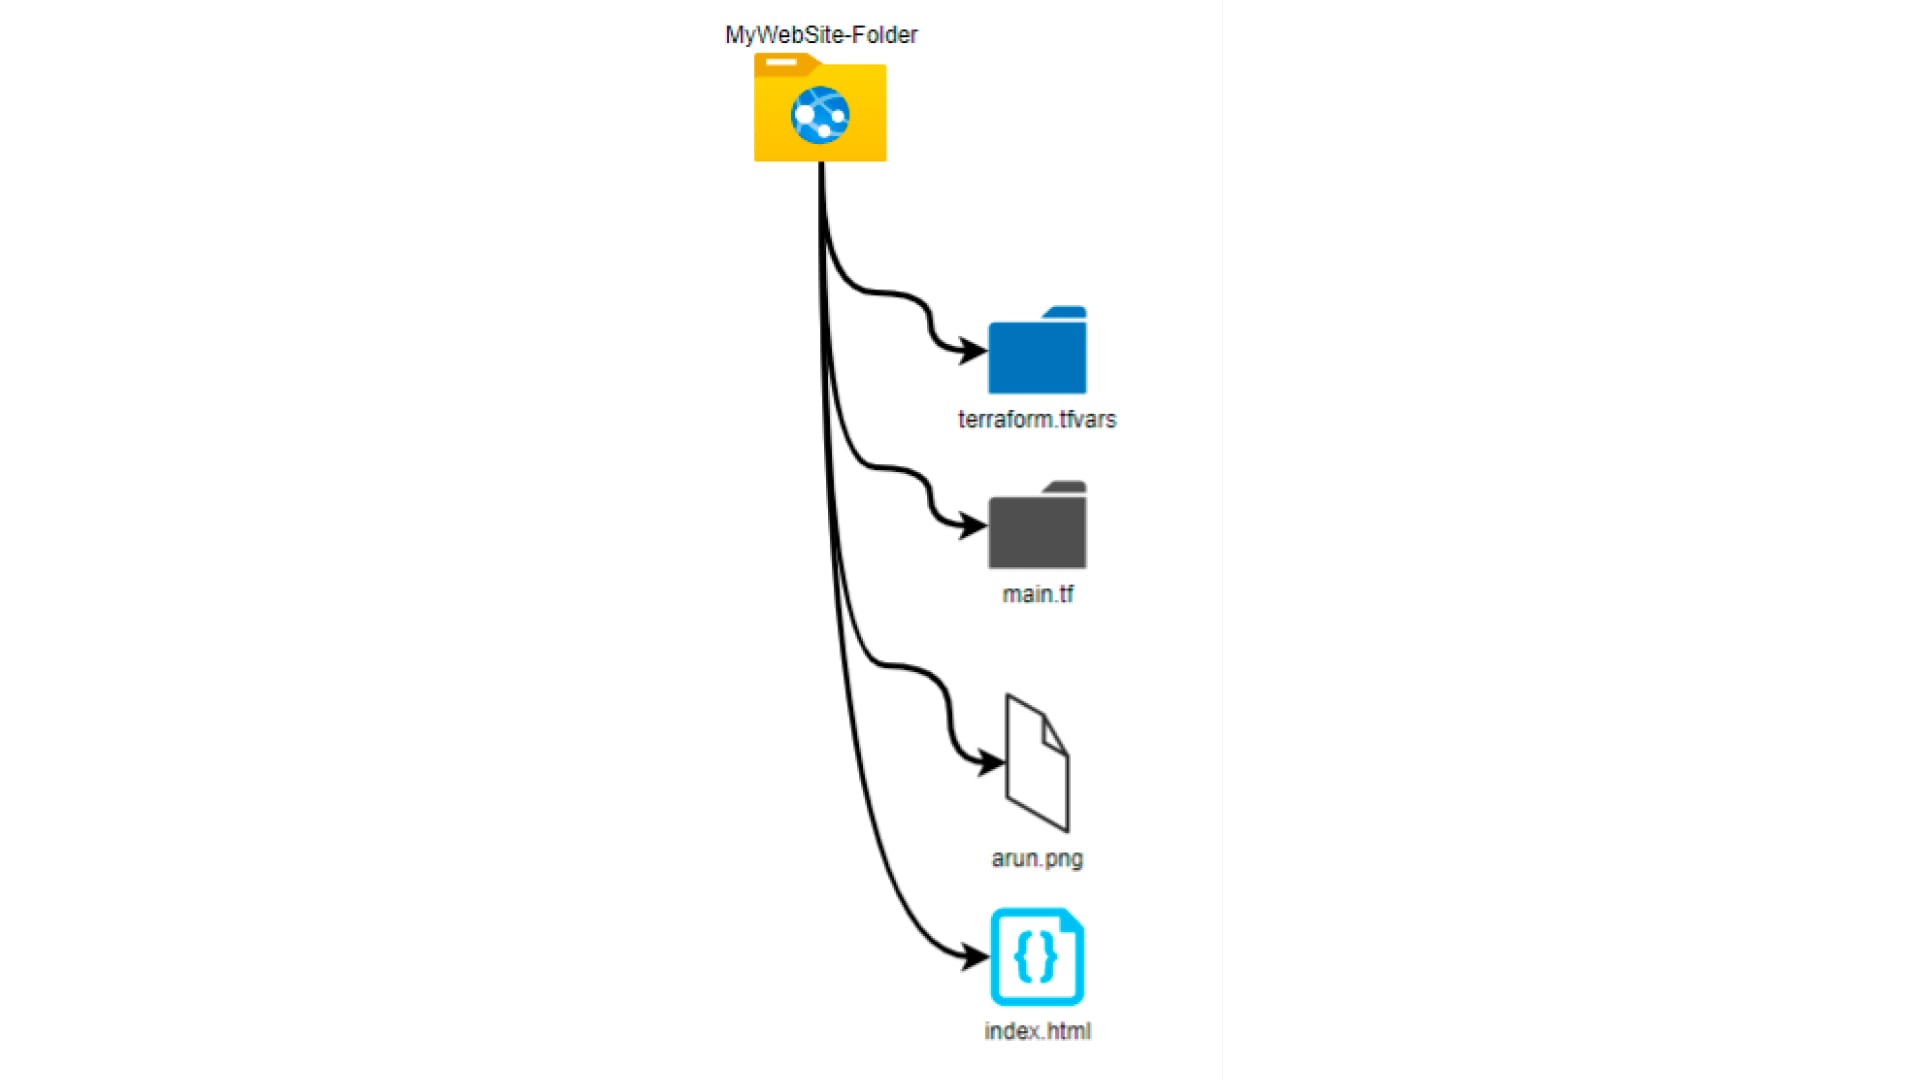
- terraform.tfvars contains the actual values for the variables that are scattered and repeated throughout in the main Terraform file
- Main.tf is the main Terraform file containing all the configuration language needed to make the API calls and create the objects in AWS
- Arun.png is just a picture file that will be used for the website
- Index.html is the html code that, at a very basic level, call the picture file to have it rendered for our website
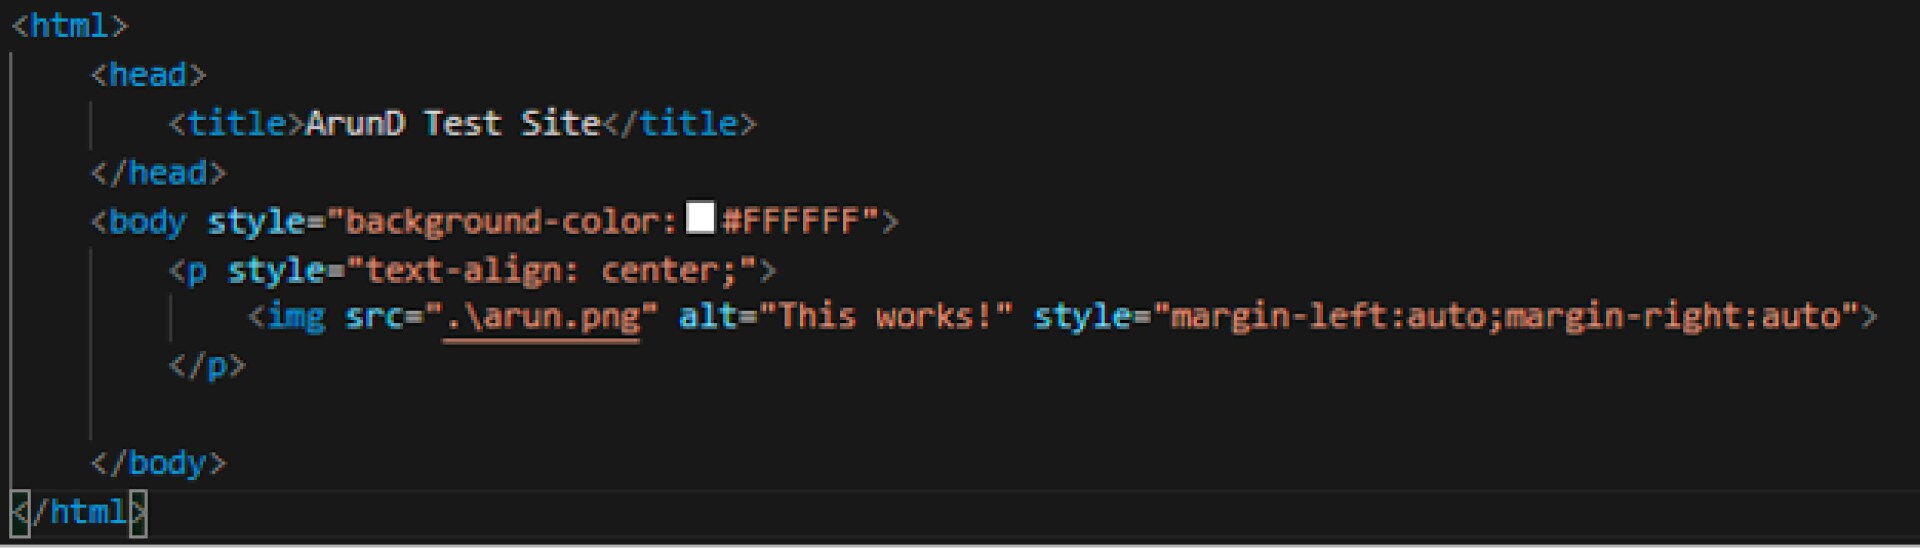
index.html
Basic html code that references the arun.png file
arun.png
Basic picture file
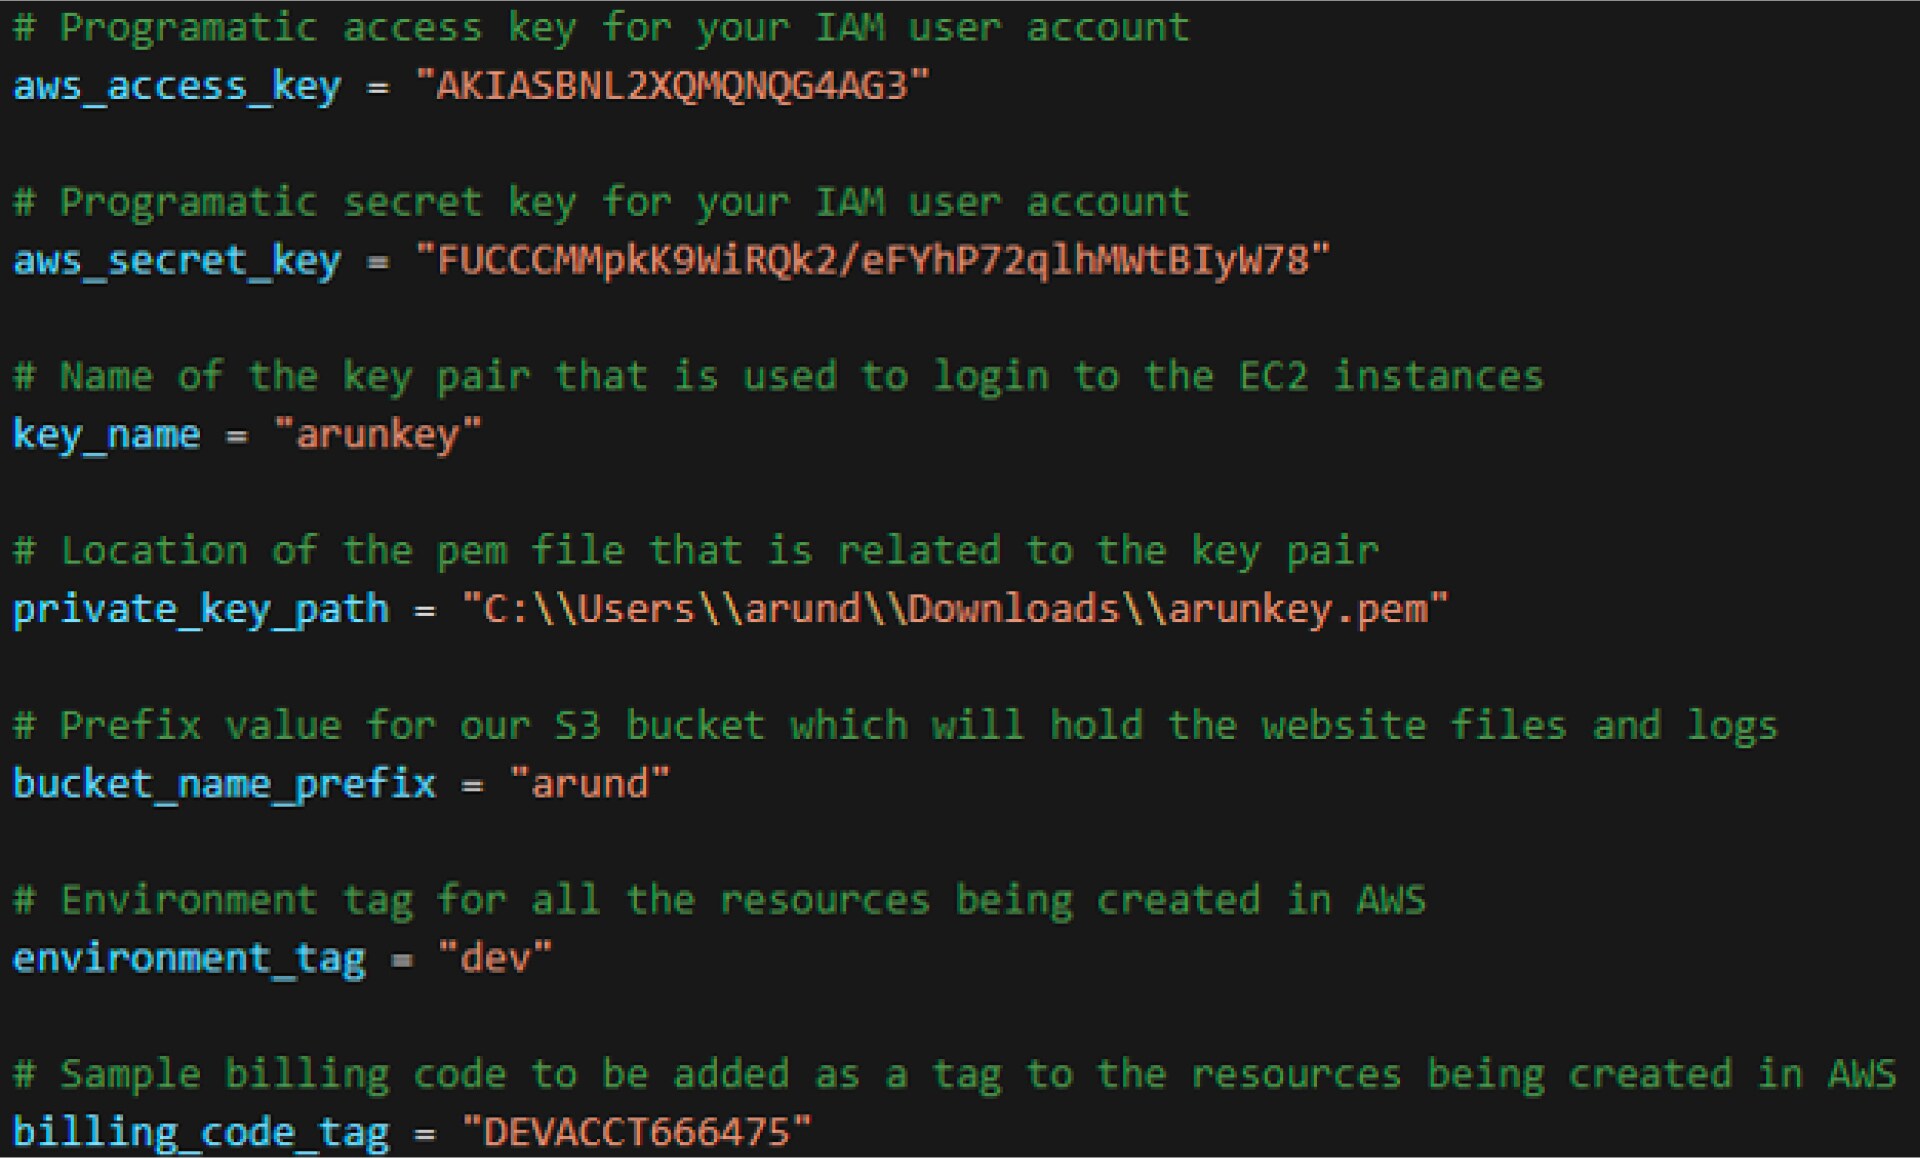
terraform.tfvars
- The access key and secret key are obtained when you create an IAM user with programmatic access in AWS
- The key pair is your key to access any EC2 instances that it is used to create
- The pem file is downloaded when you create your key pair
- The bucket name prefix is the first part of the S3 bucket; the second part will be a random number (as you will see later with the rand Terraform function) (The reason I have it this way is because S3 bucket names have to be unique at a global level, not only in your own AWS account[s].)
- The environment tag will be used to create a tag for all the AWS objects
- The billing code will also be used to create a tag for all AWS objects (Both tag options are great for billing and reporting.)
main.tf
This file is where the magic happens. Although I have all the items in one file, I usually segregate the portions out, as what I found is that during troubleshooting and/or adding more resources, going to a specific file representing the resource is cleaner than scrambling through thousands of lines of code.
As an example, I would normally create a subnets.tf file, which contains all the subnets for the VPC(s), as opposed to what I am doing here, and putting the subnets portion of the environment mixed in with the rest of the ingredients in the pot. With that being said, let’s dissect the main.tf file:
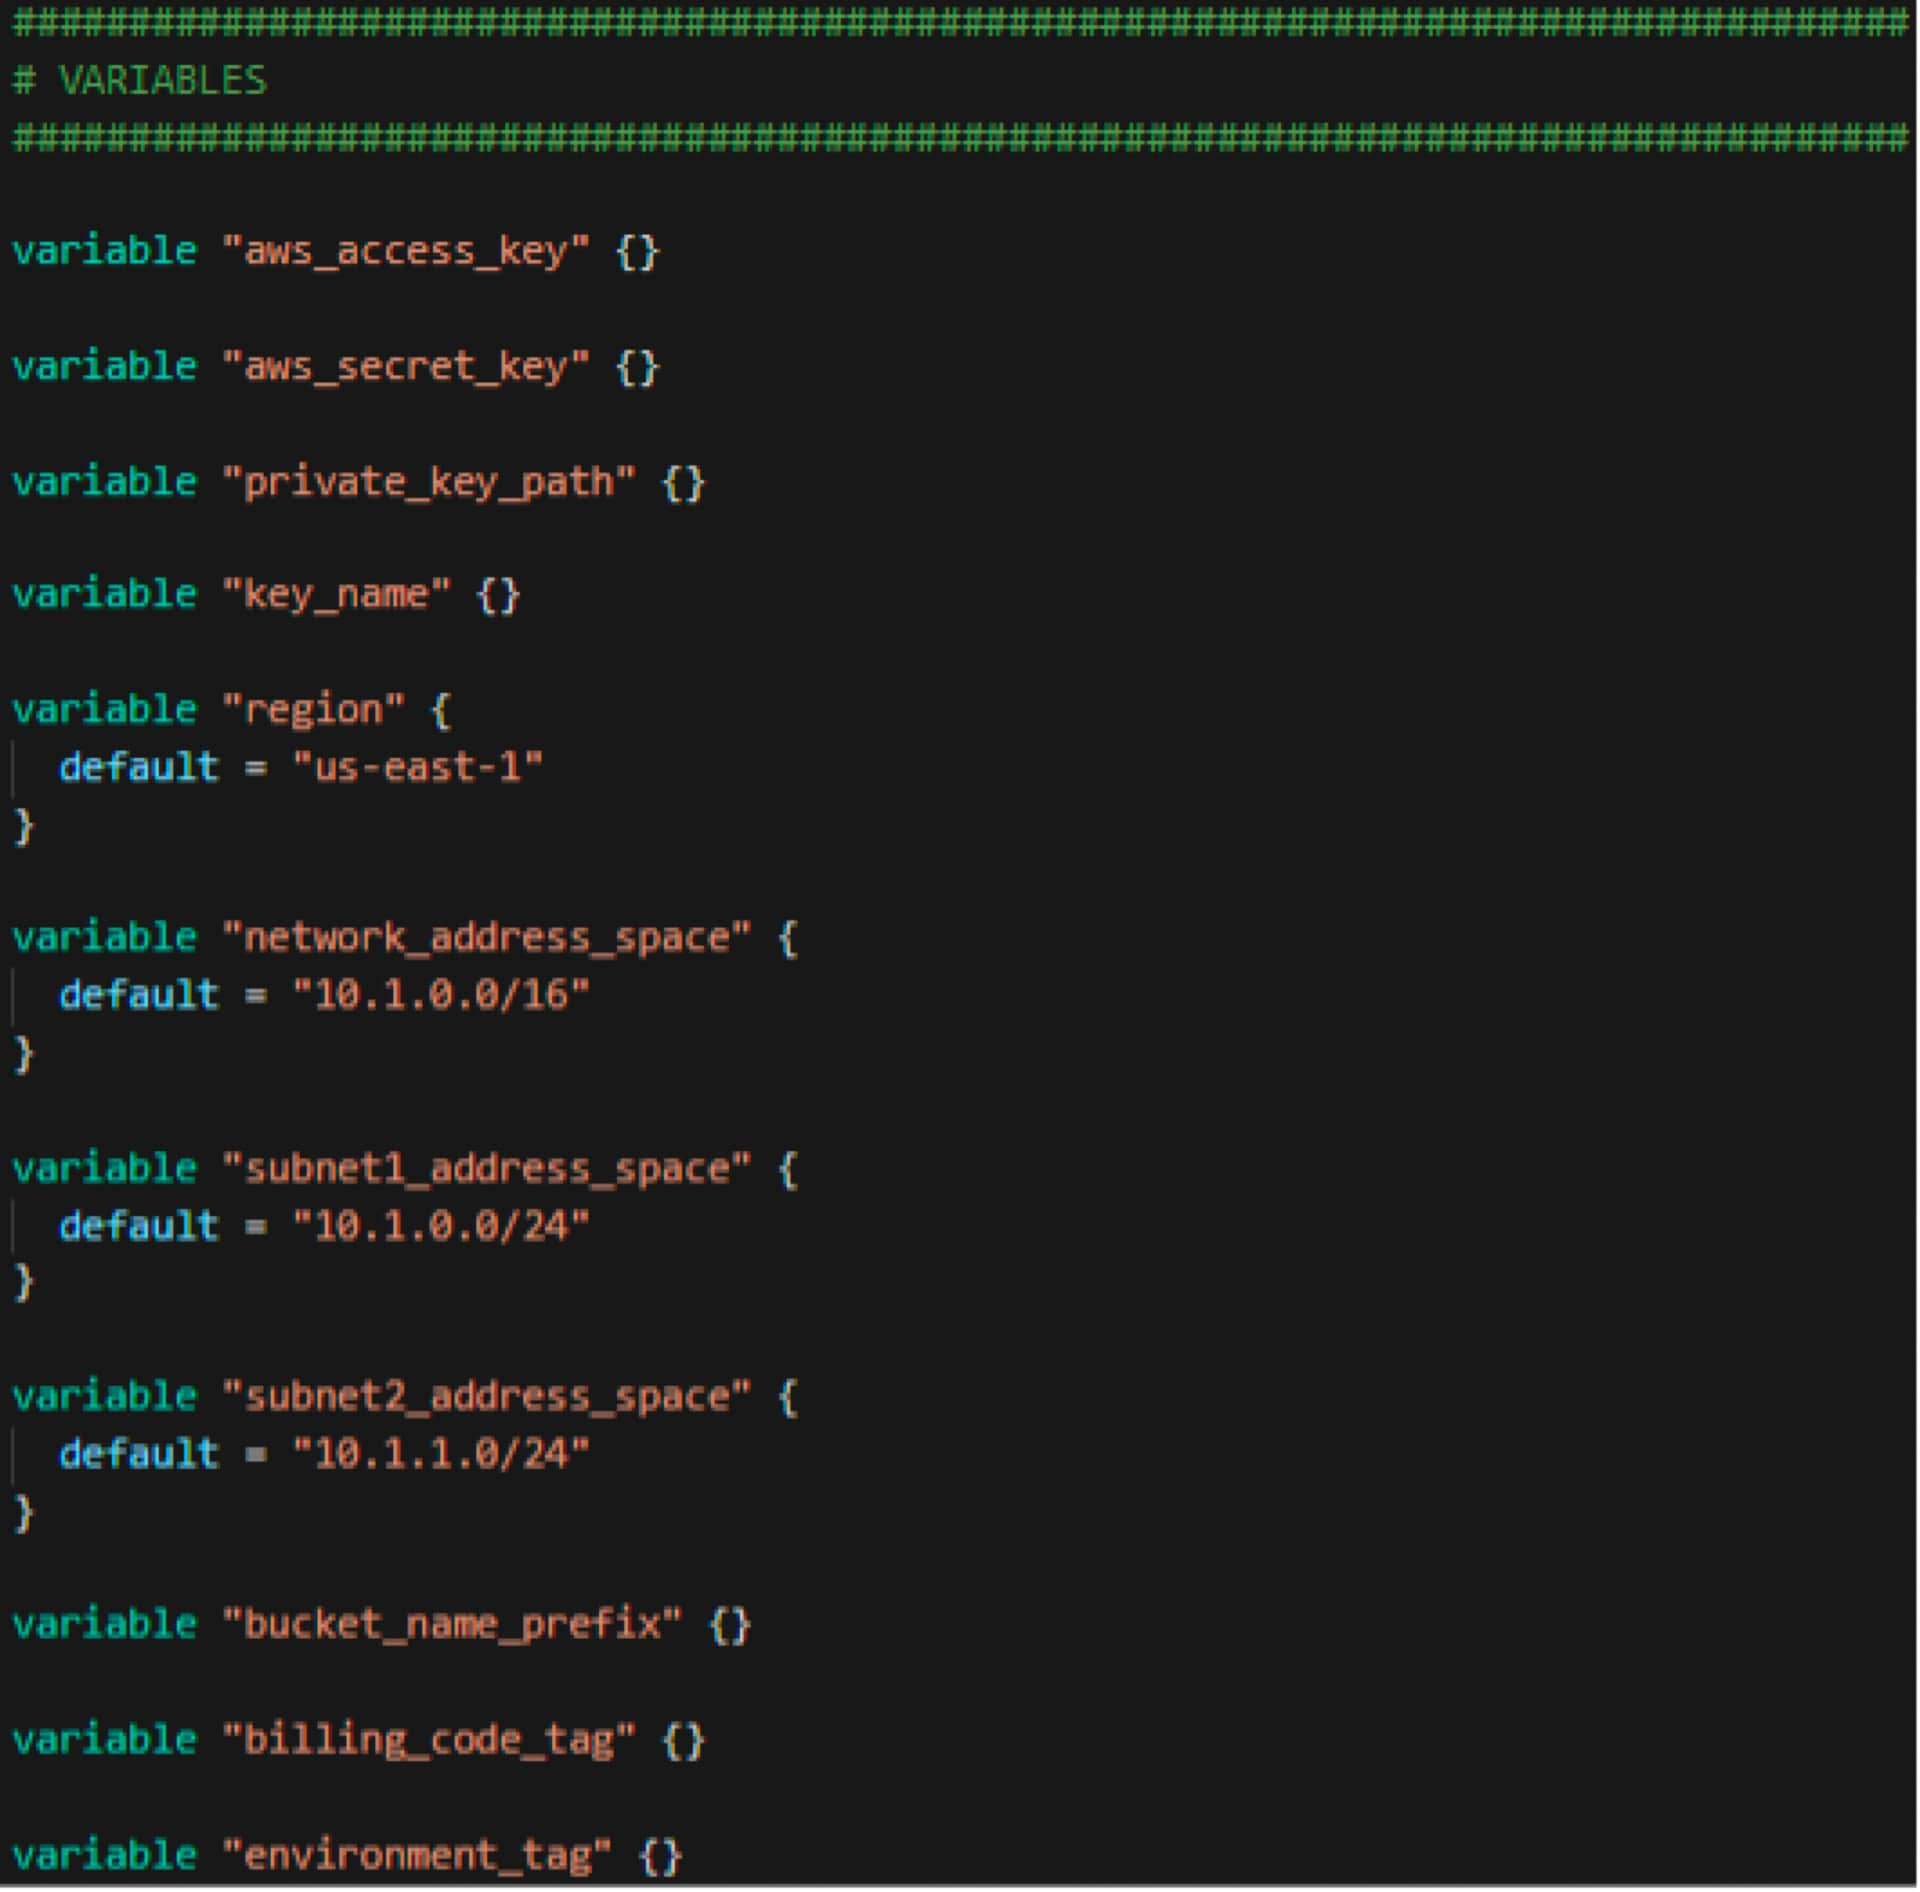
- Variables:
this portion ties directly to the terraform.tfvars file, where the variables section gives you the plate and the terraform.tfvars fills the plate with the respective food. As you can see, there are references to default values and these come into play where the data isn’t present in the terraform.tfvars file. I could have defined the terraform.tvars with the network_address_space, but because I don’t have any data there, Terraform will use the default value stated here, which is 10.1.0.0/16
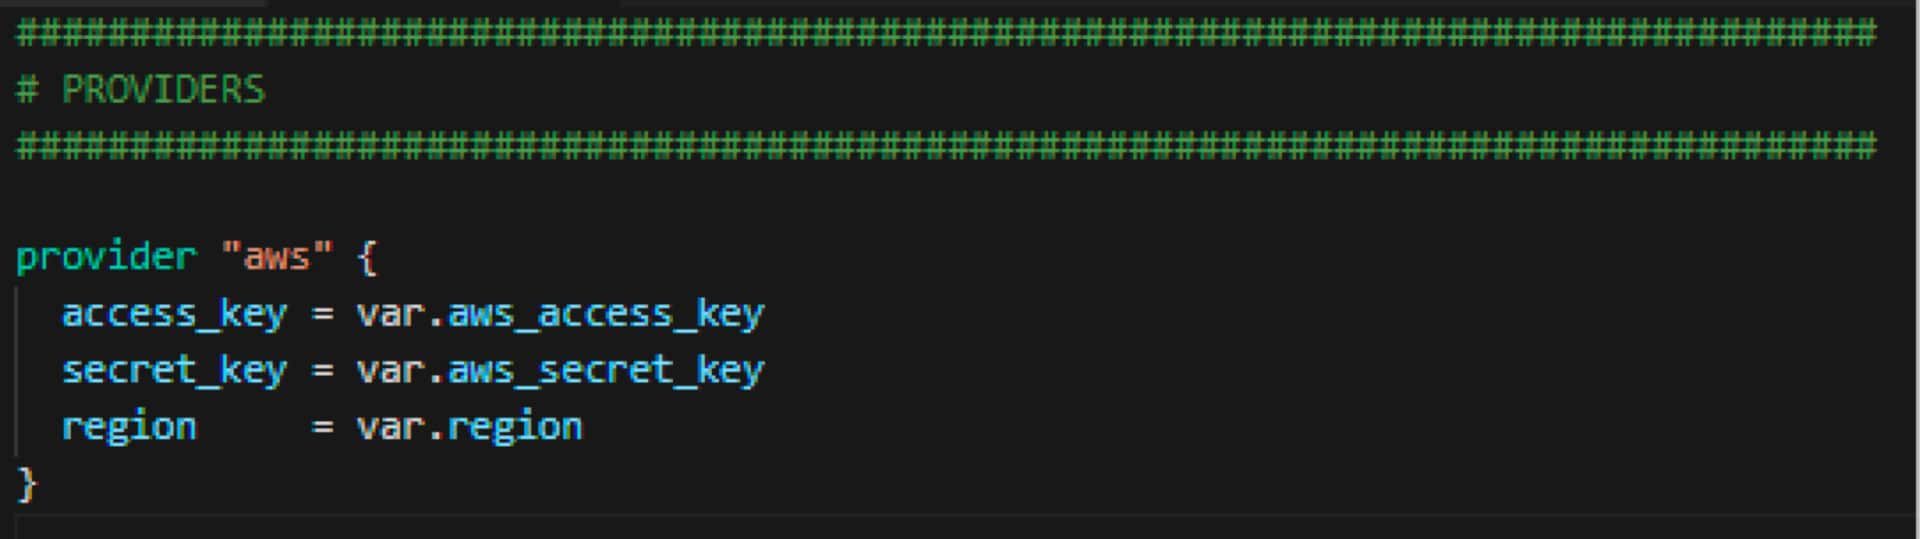
Providers
This is the section where we define the provider or plugin for the vendor where the objects will be created. For our sample, we are using AWS and we are telling Terraform to use the programmatic keys and region that were stated in the terraform.tfvars file and the variables section.
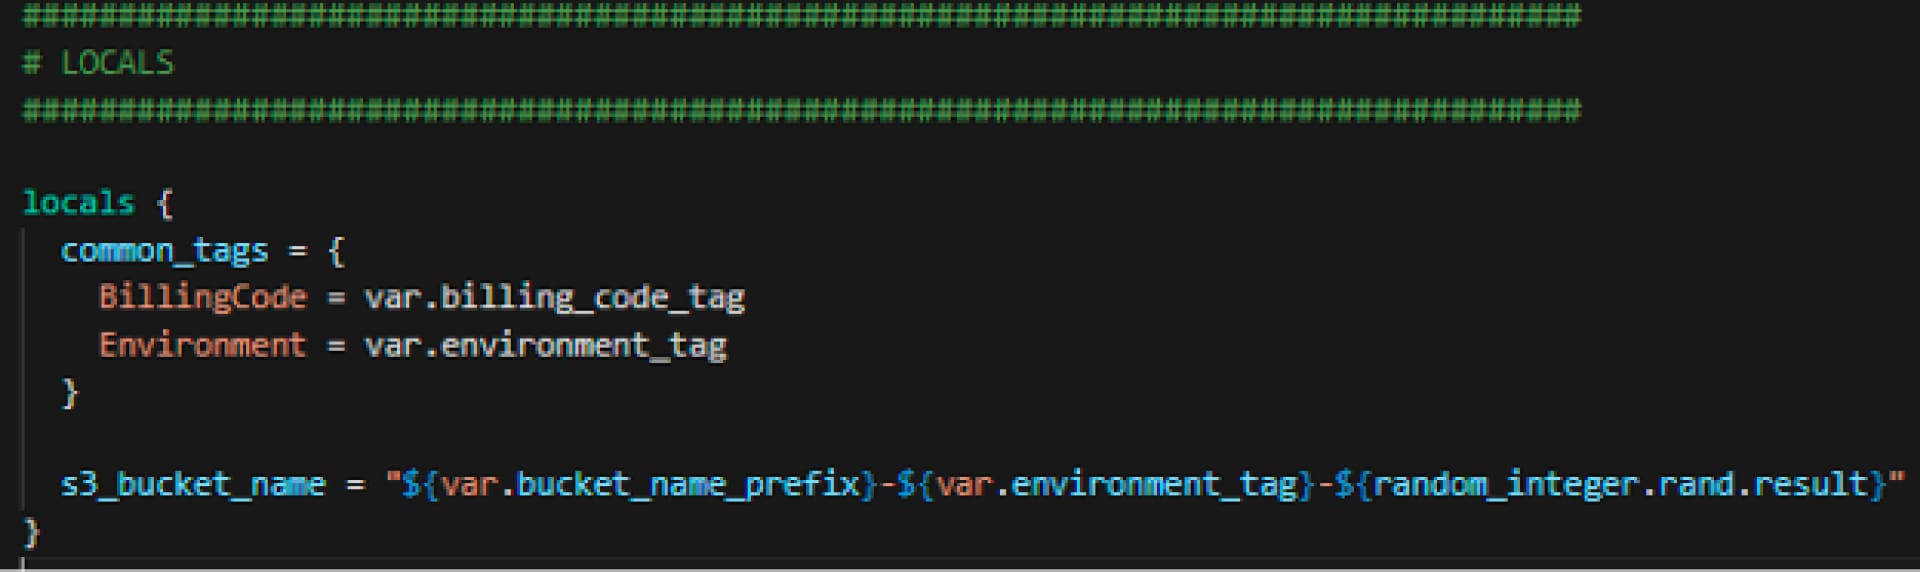
Locals
This is the section where we create some local items that can be referenced later in the code. Specifically, we are creating the tag names. Again, wherever var. is referenced, Terraform will use the variables defined earlier. Here I am also creating the name of the s3 bucket that is being interpolated using the variable data as well as the Terraform random function, which we will see more of later in the script.
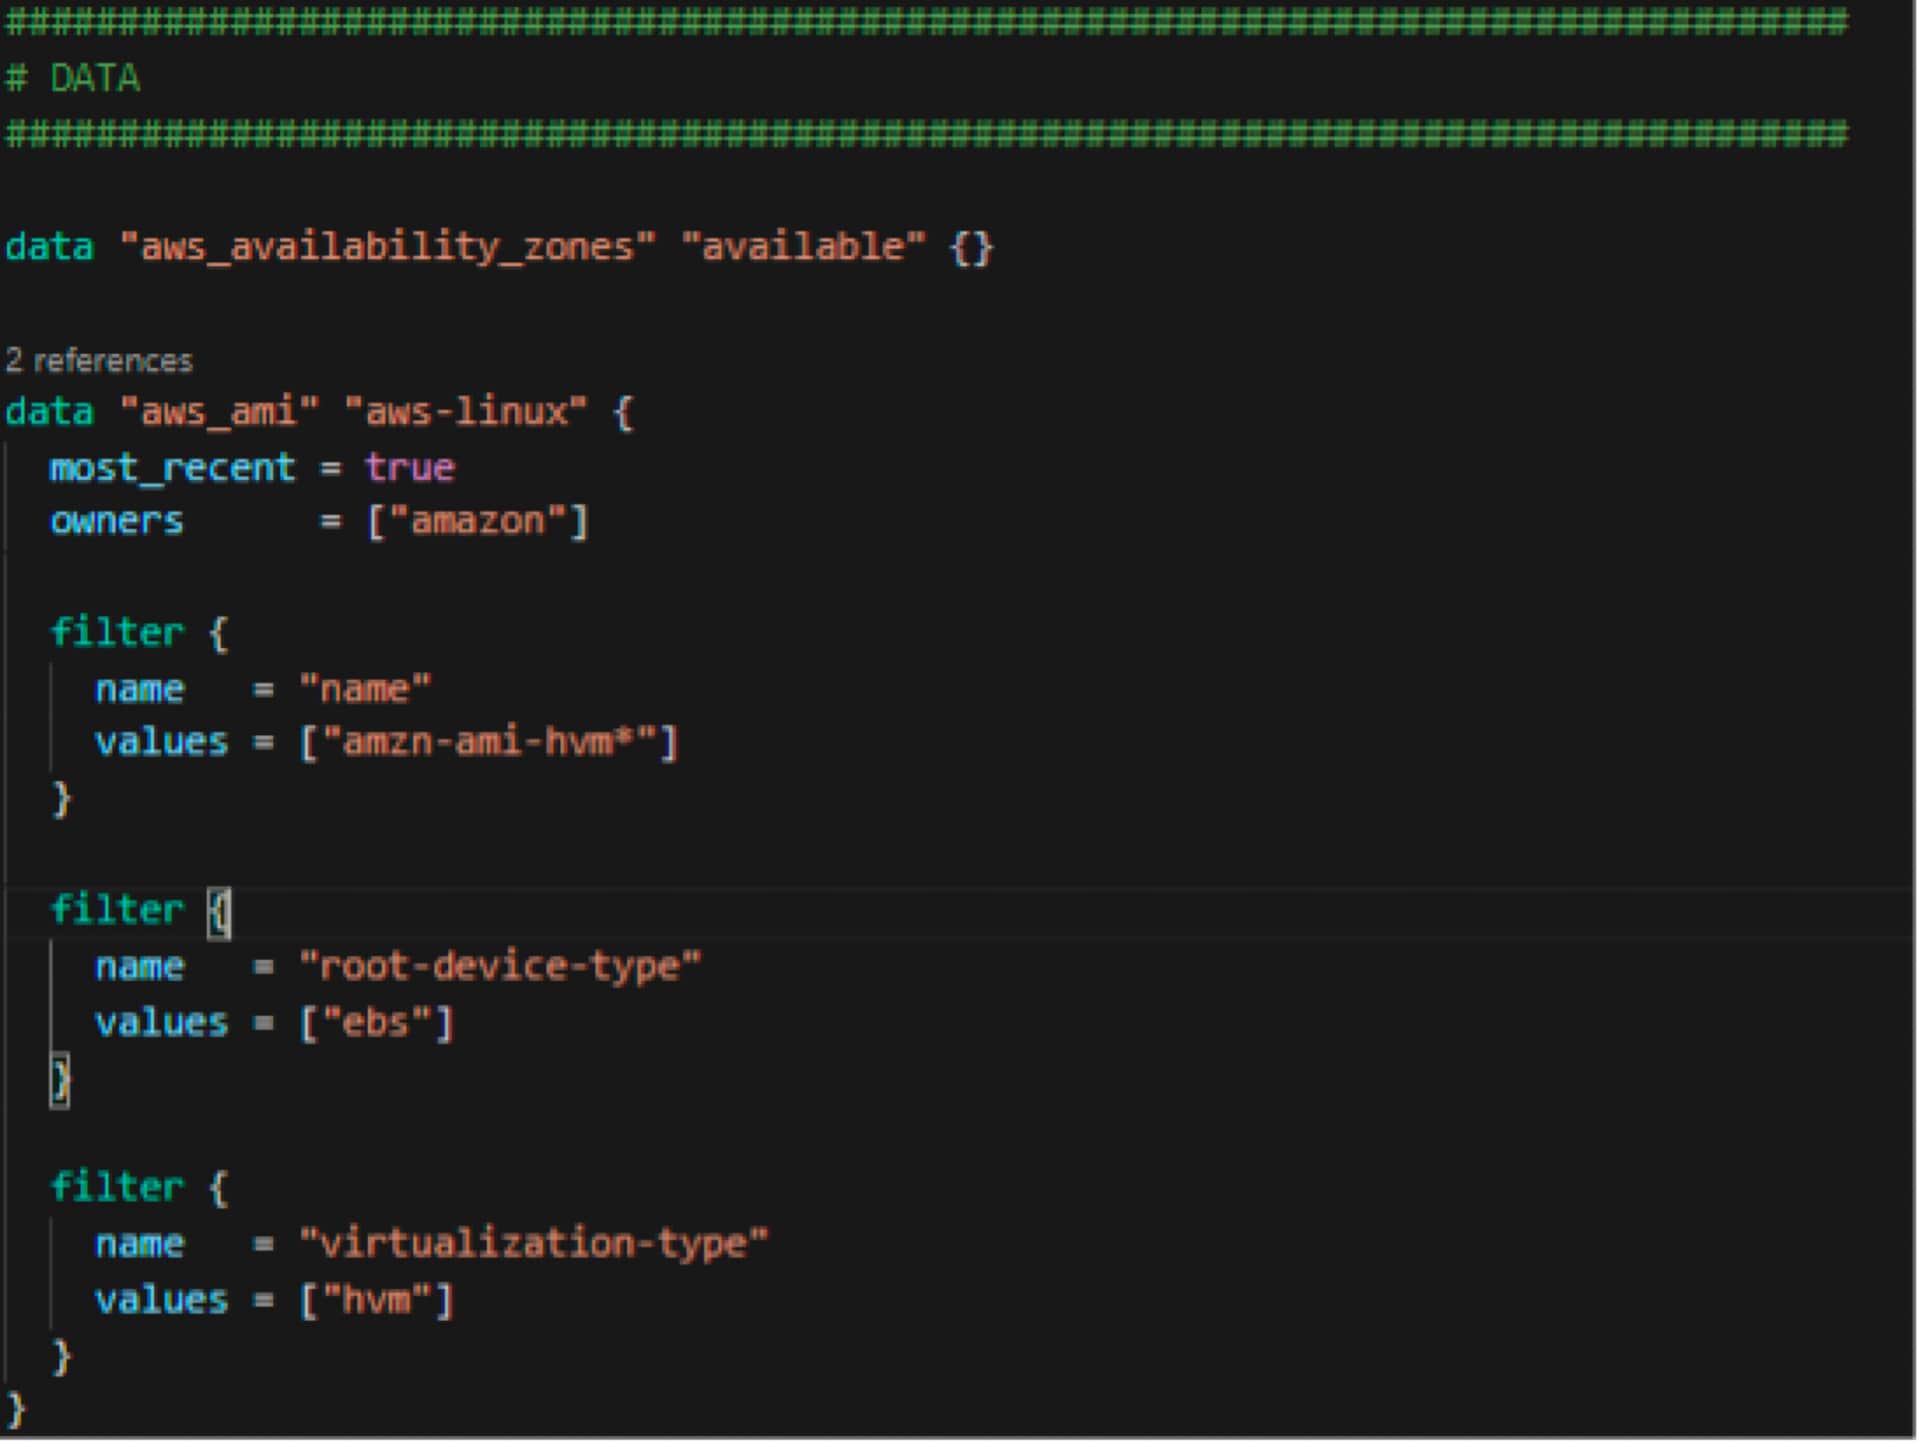
Data
The data sources section allows us to use predefined items in AWS by AWS, outside of our control and/or Terraform. Examples that we see here are availability zones and Amazon Machine Images (AMIs) for EC2 instances. Here we are going after usable Availability Zones (AZs) and the most recent Amazon Linux with Elastic Block Store (EBS) available for storage. Again, these are already done by the powers that be at AWS, and we are going to merely reference them and use them as we need them.
Resources
The resource block is where the party starts. Each block represents an object in AWS, which will be created once the Terraform code is run.
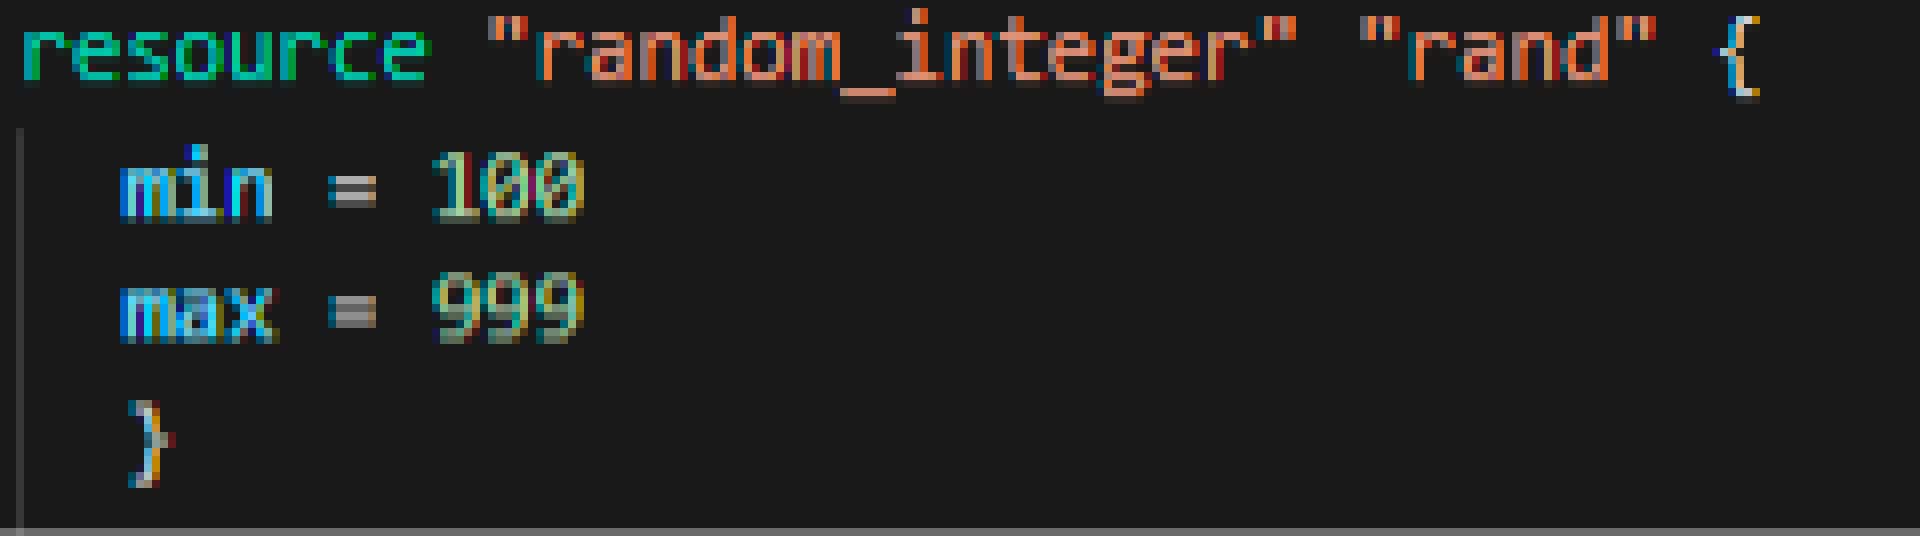
Random Integer:
This is a function from Terraform that creates a random number based on the minimum number and maximum number defined in the block. This is what was used for the second part of naming the S3 bucket above.
Networking:
VPC, Internet Gateway, Subnets. As you can see, each object is tagged and the tags are merged with various parts of the code including the common tags above as well as the environment tag from the variable section. Here it is also defined that any object that is created in these subnets will automatically get a public IP address.
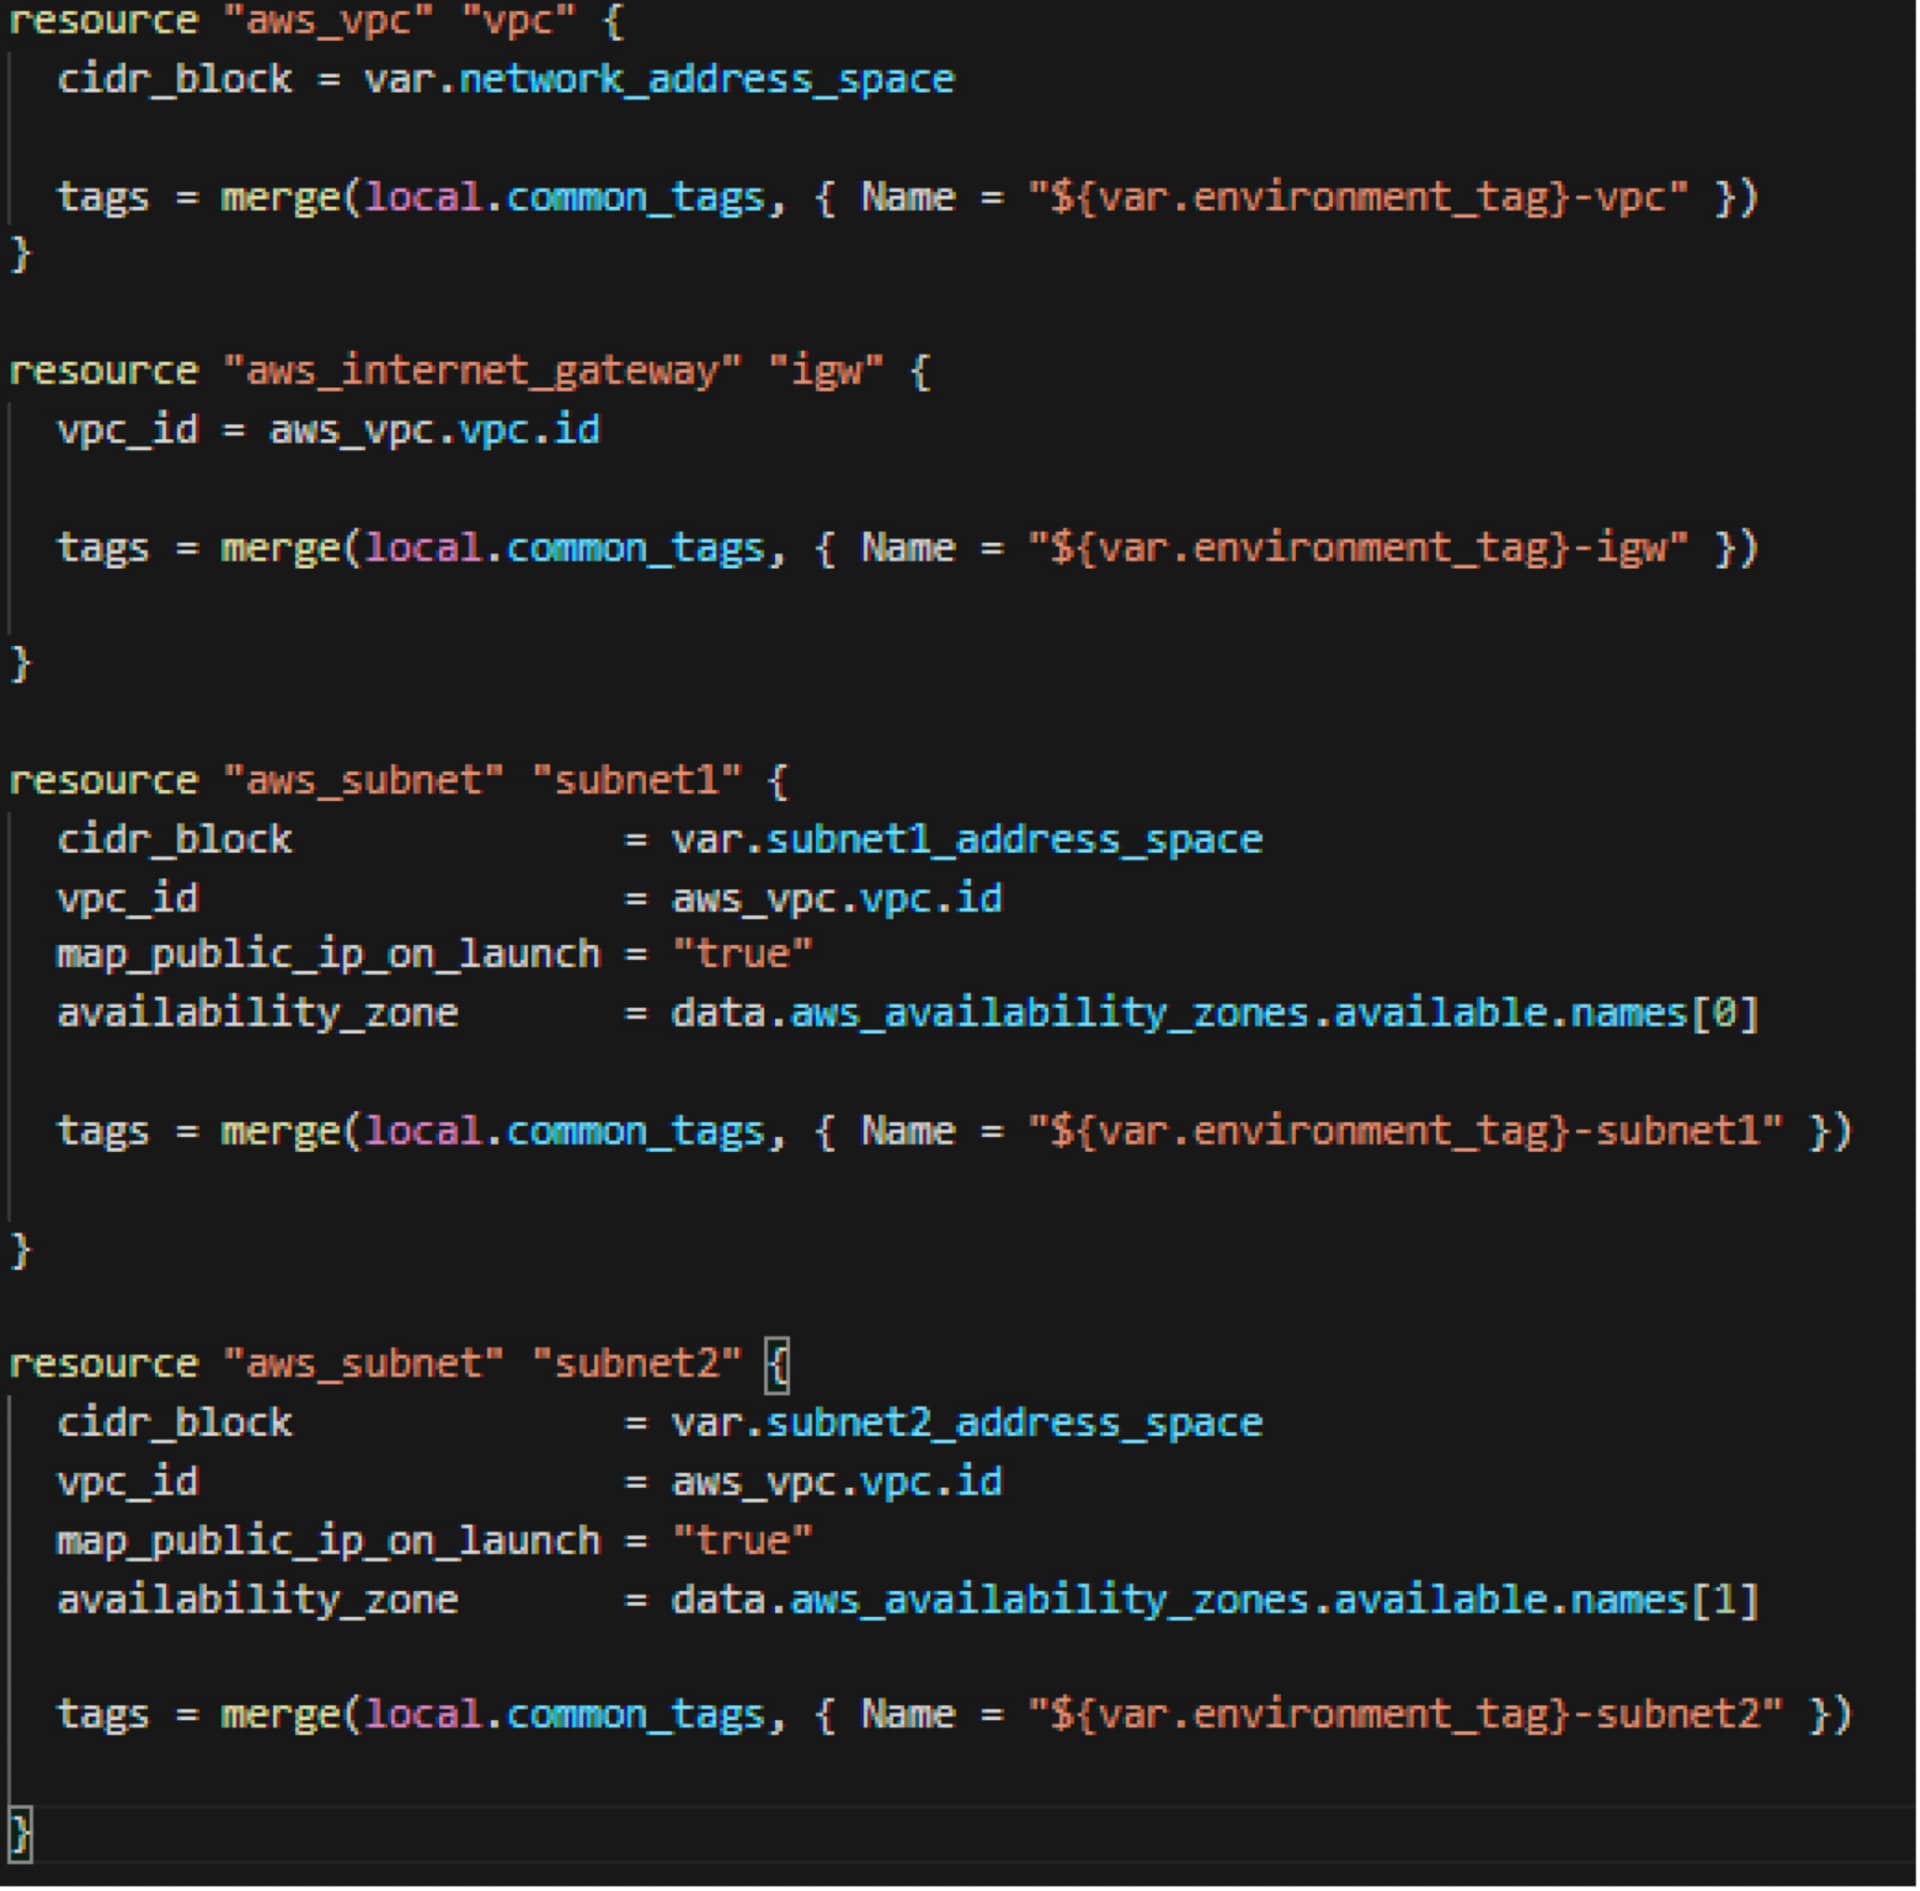
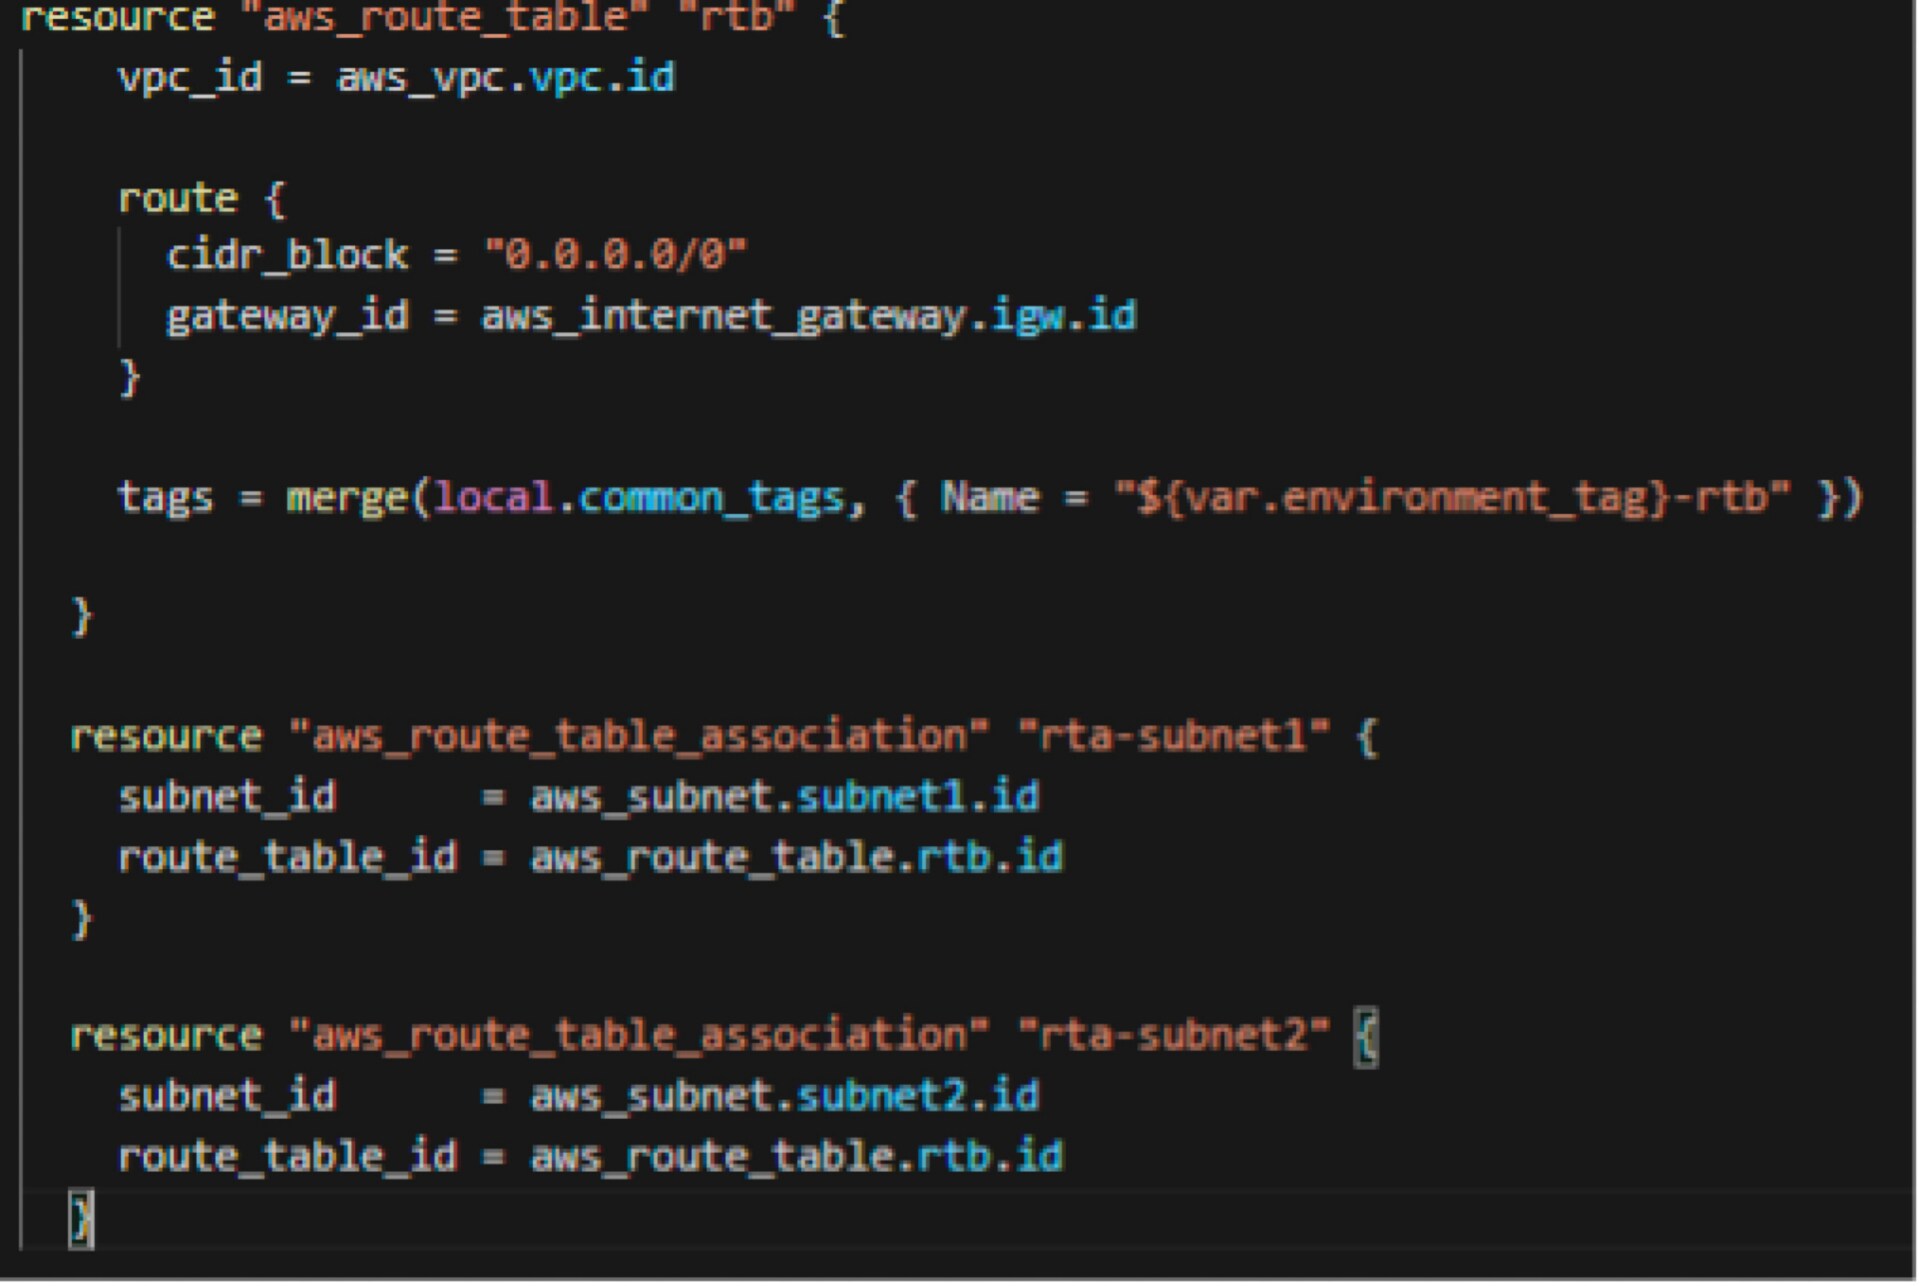
Route tables
This section defines how traffic will get out to the internet; anything to 0.0.0.0/0 should leave out the Internet Gateway. Here, I also defined the two subnets that will be attached to this route table.
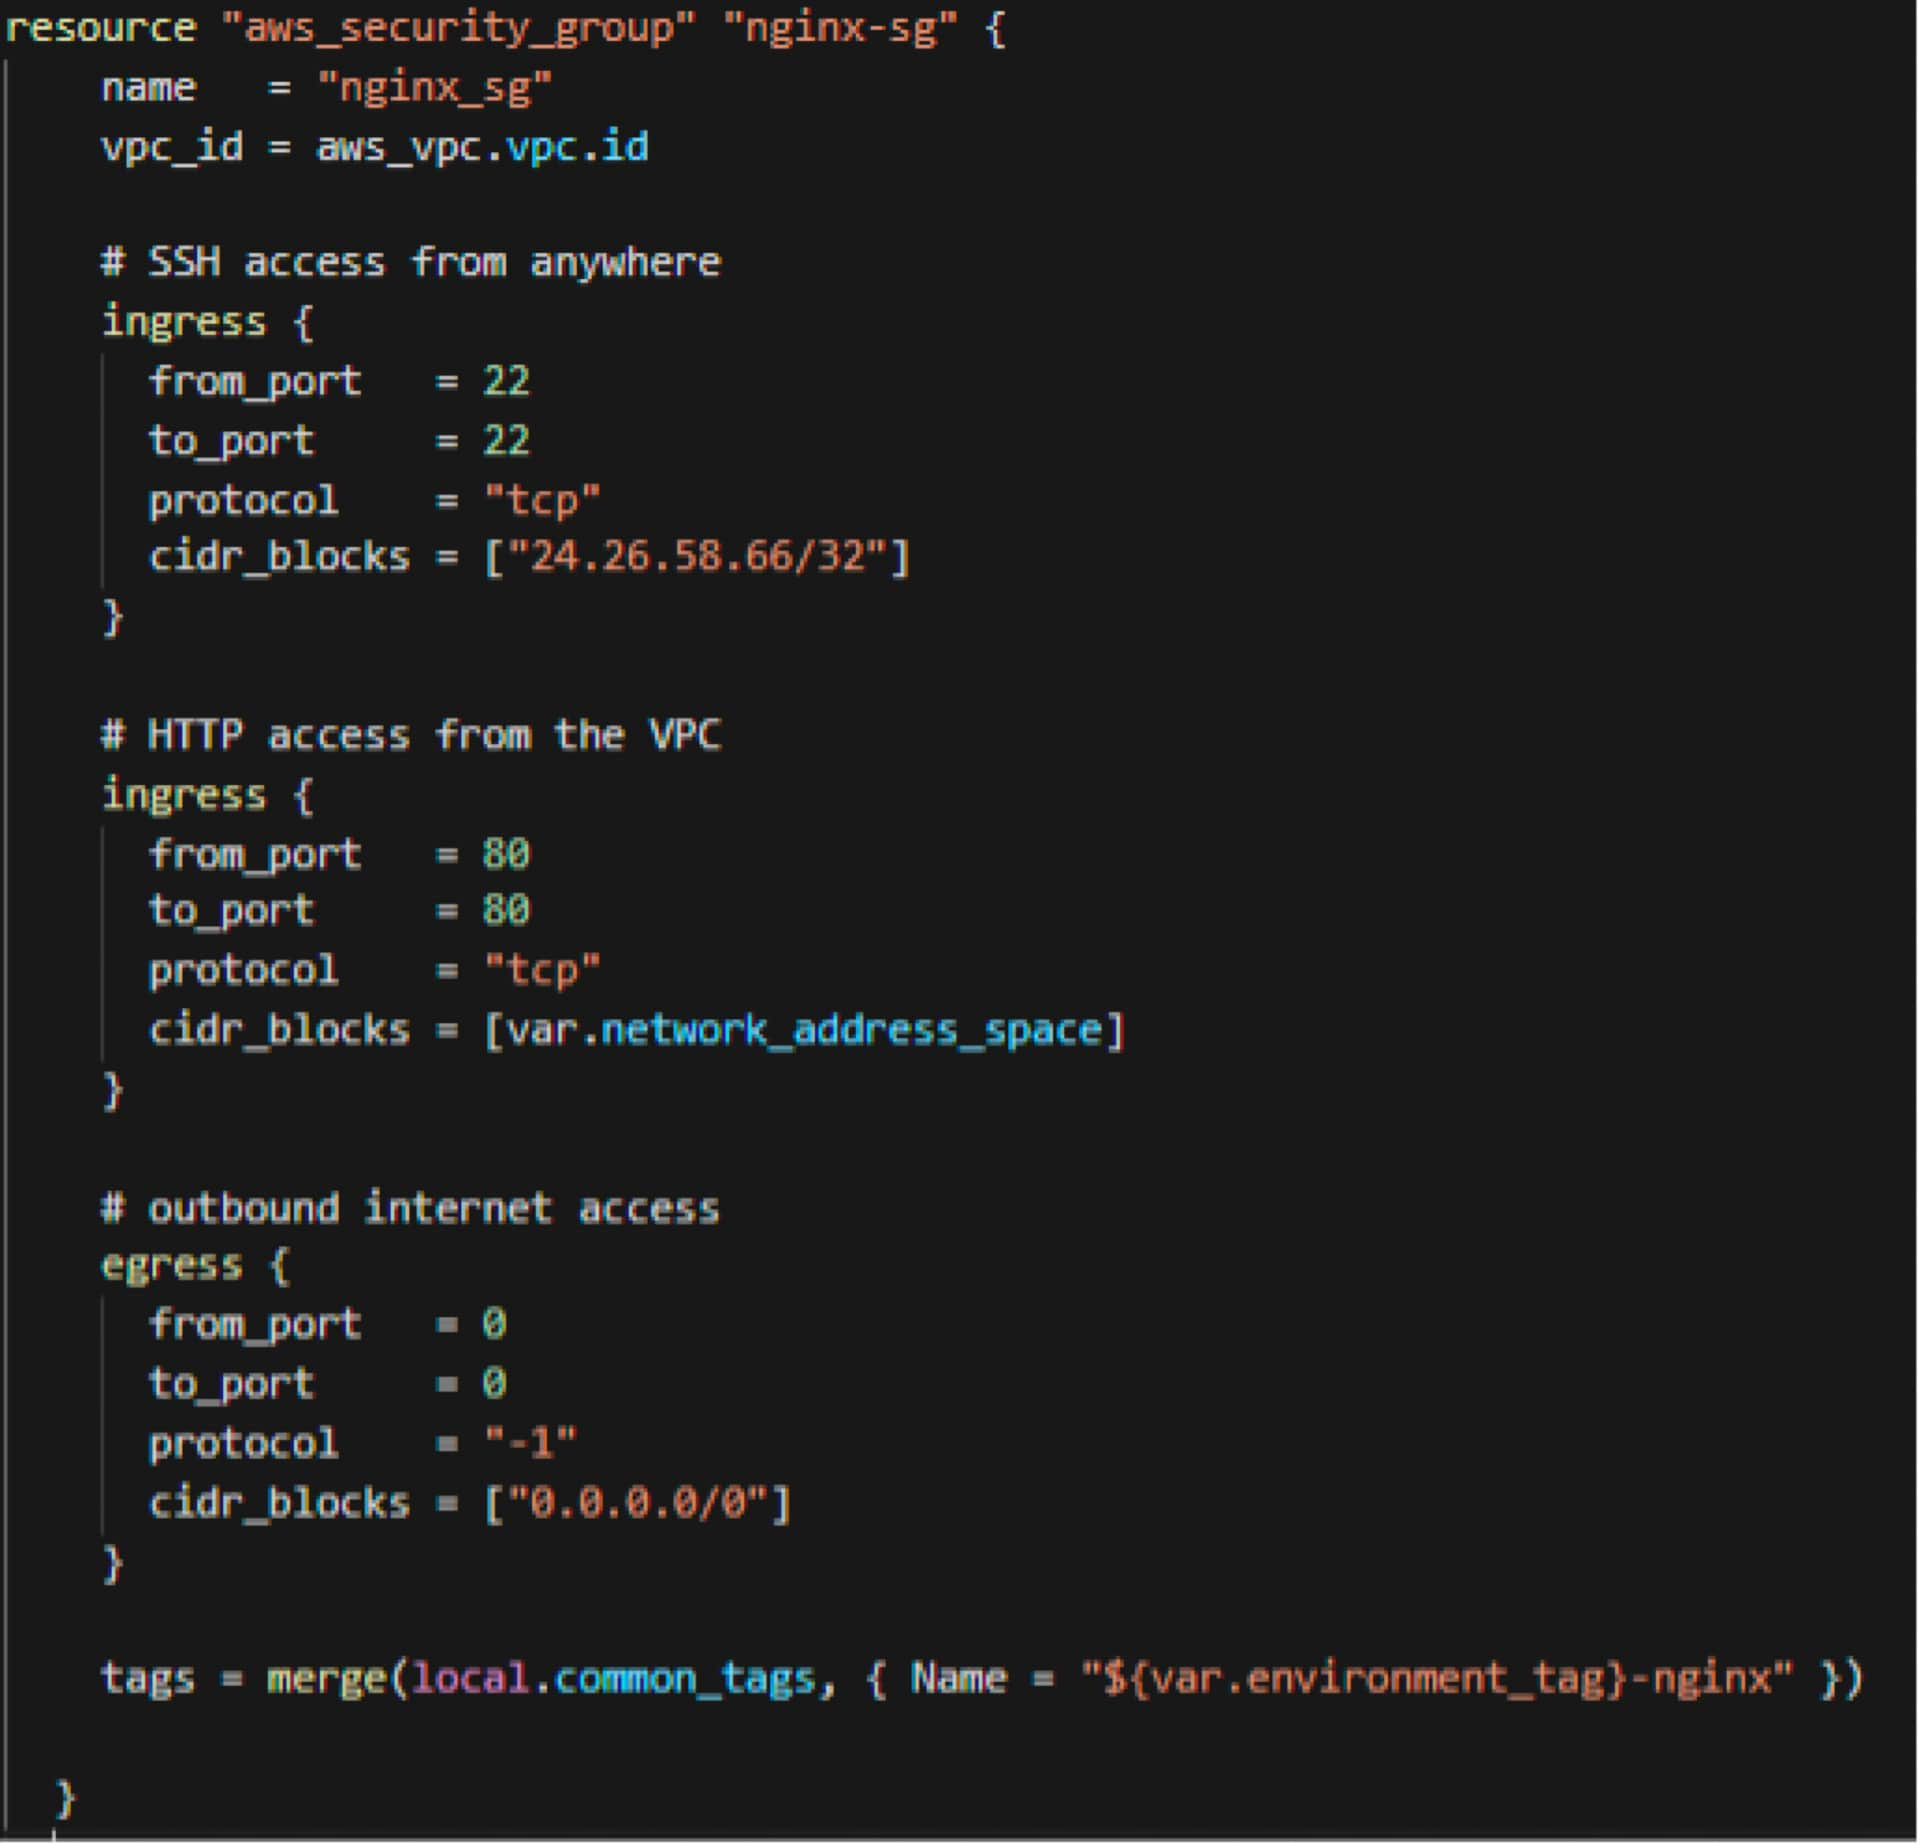
Security Group 1
Here, I start defining the security groups, specifically the EC2 security group, which will be tied to the EC2 instances where NGINX will be running. You can see that I defined the security group to.
- only allow my public home IP address to connect to the EC2 instances on port 22 (SSH)
- only allow the VPC network to access the EC2 instances on port 80 (http) (This way, only the load balancer will be able to access the EC2 on port 80 and we are not leaving it out on the public internet (0.0.0.0/0) to allow connection to port 80.)
- allow all traffic outbound from the EC2 instances
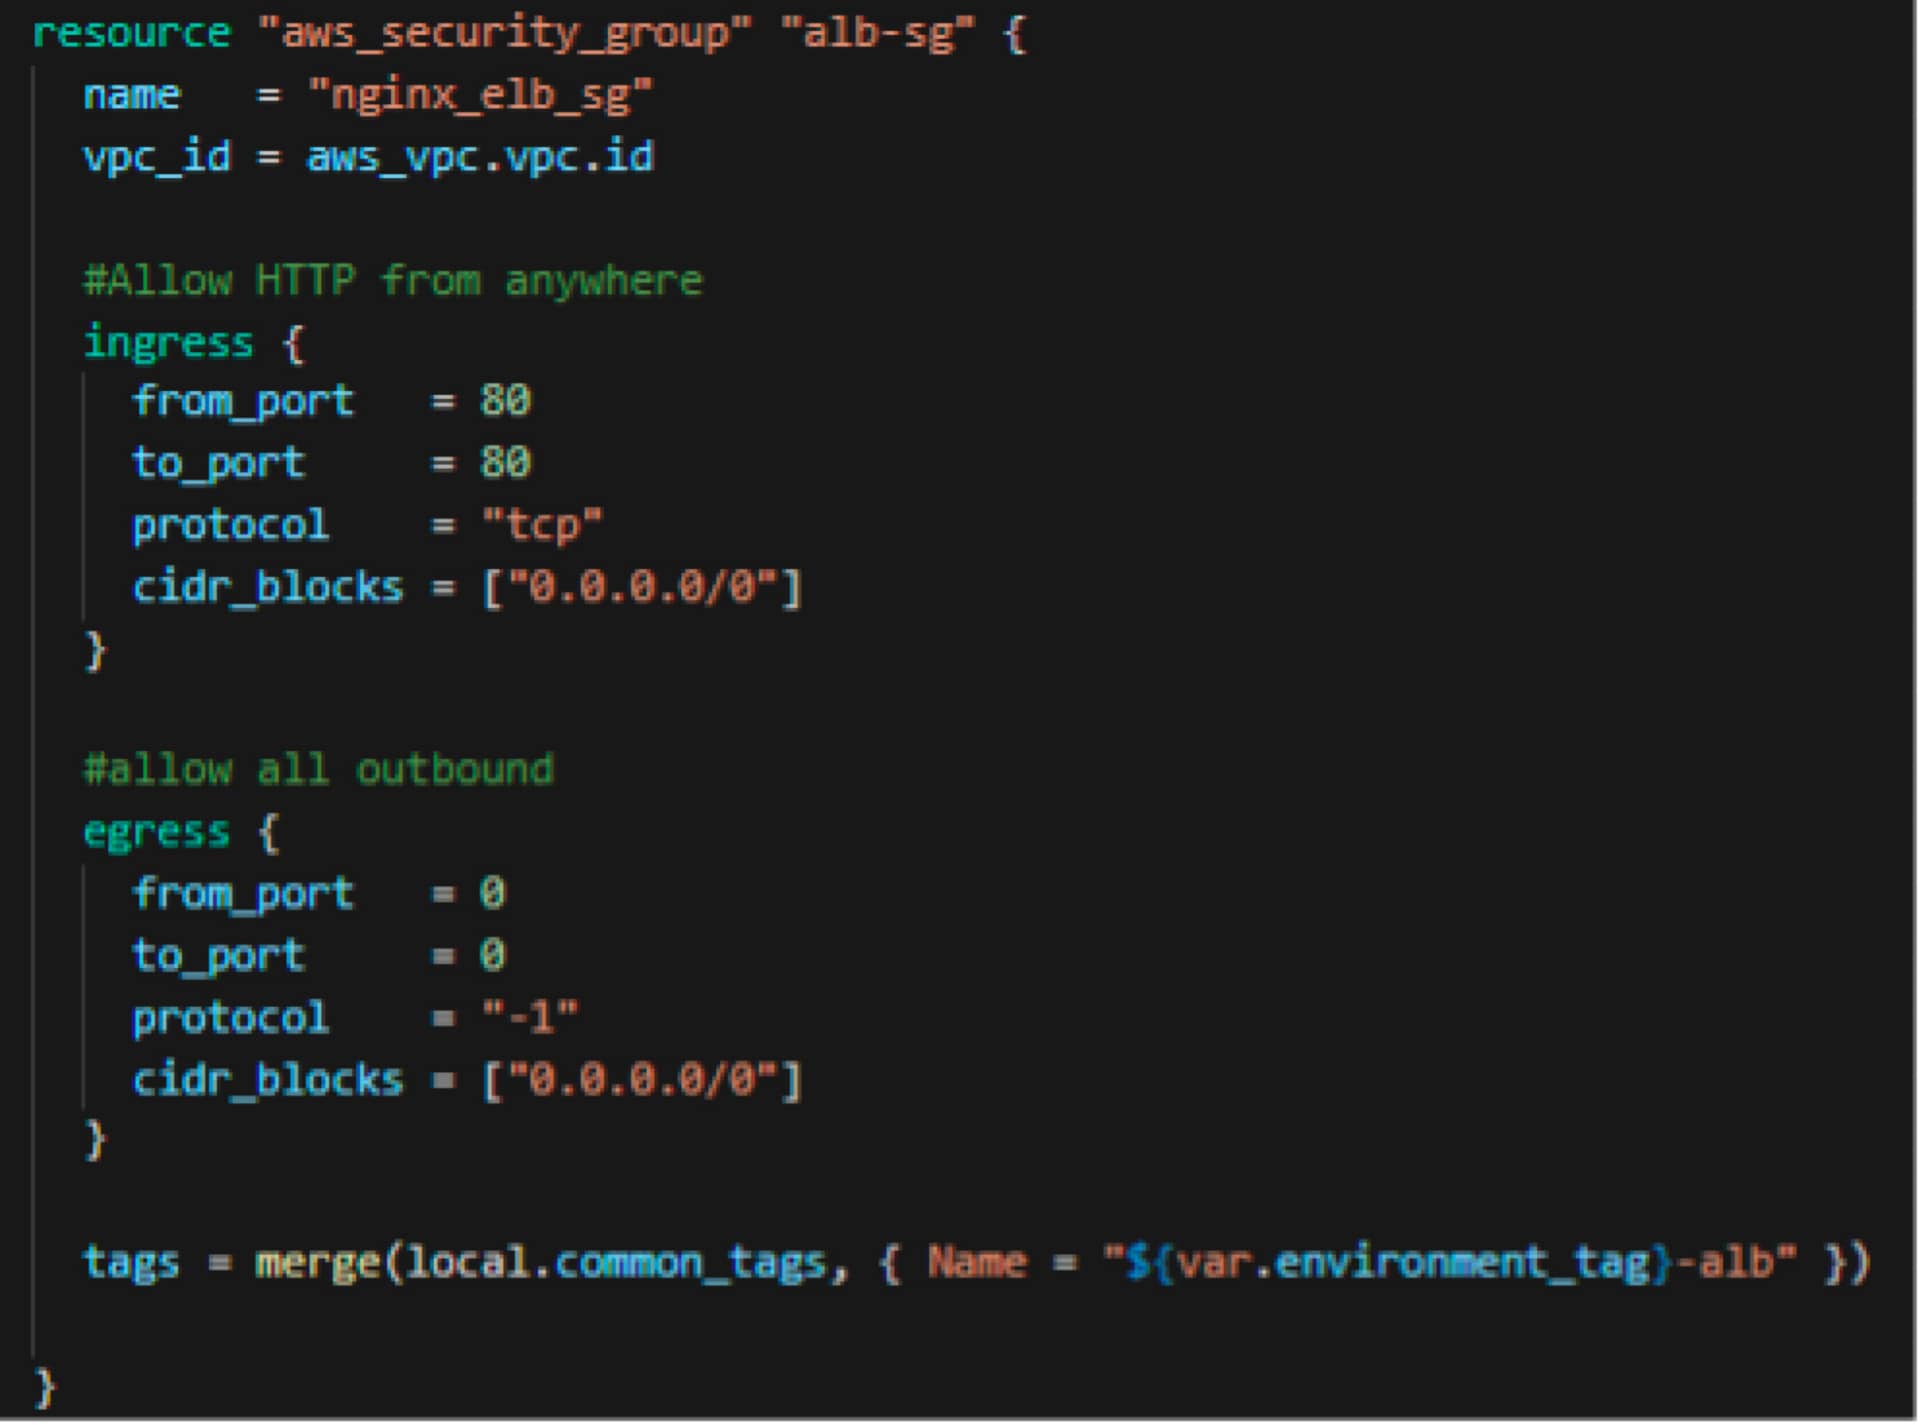
Security Group 2
Here, I am defining the security group for the load balancer where I am allowing port 80 (http) from the internet and allowing all traffic to go out to the internet.
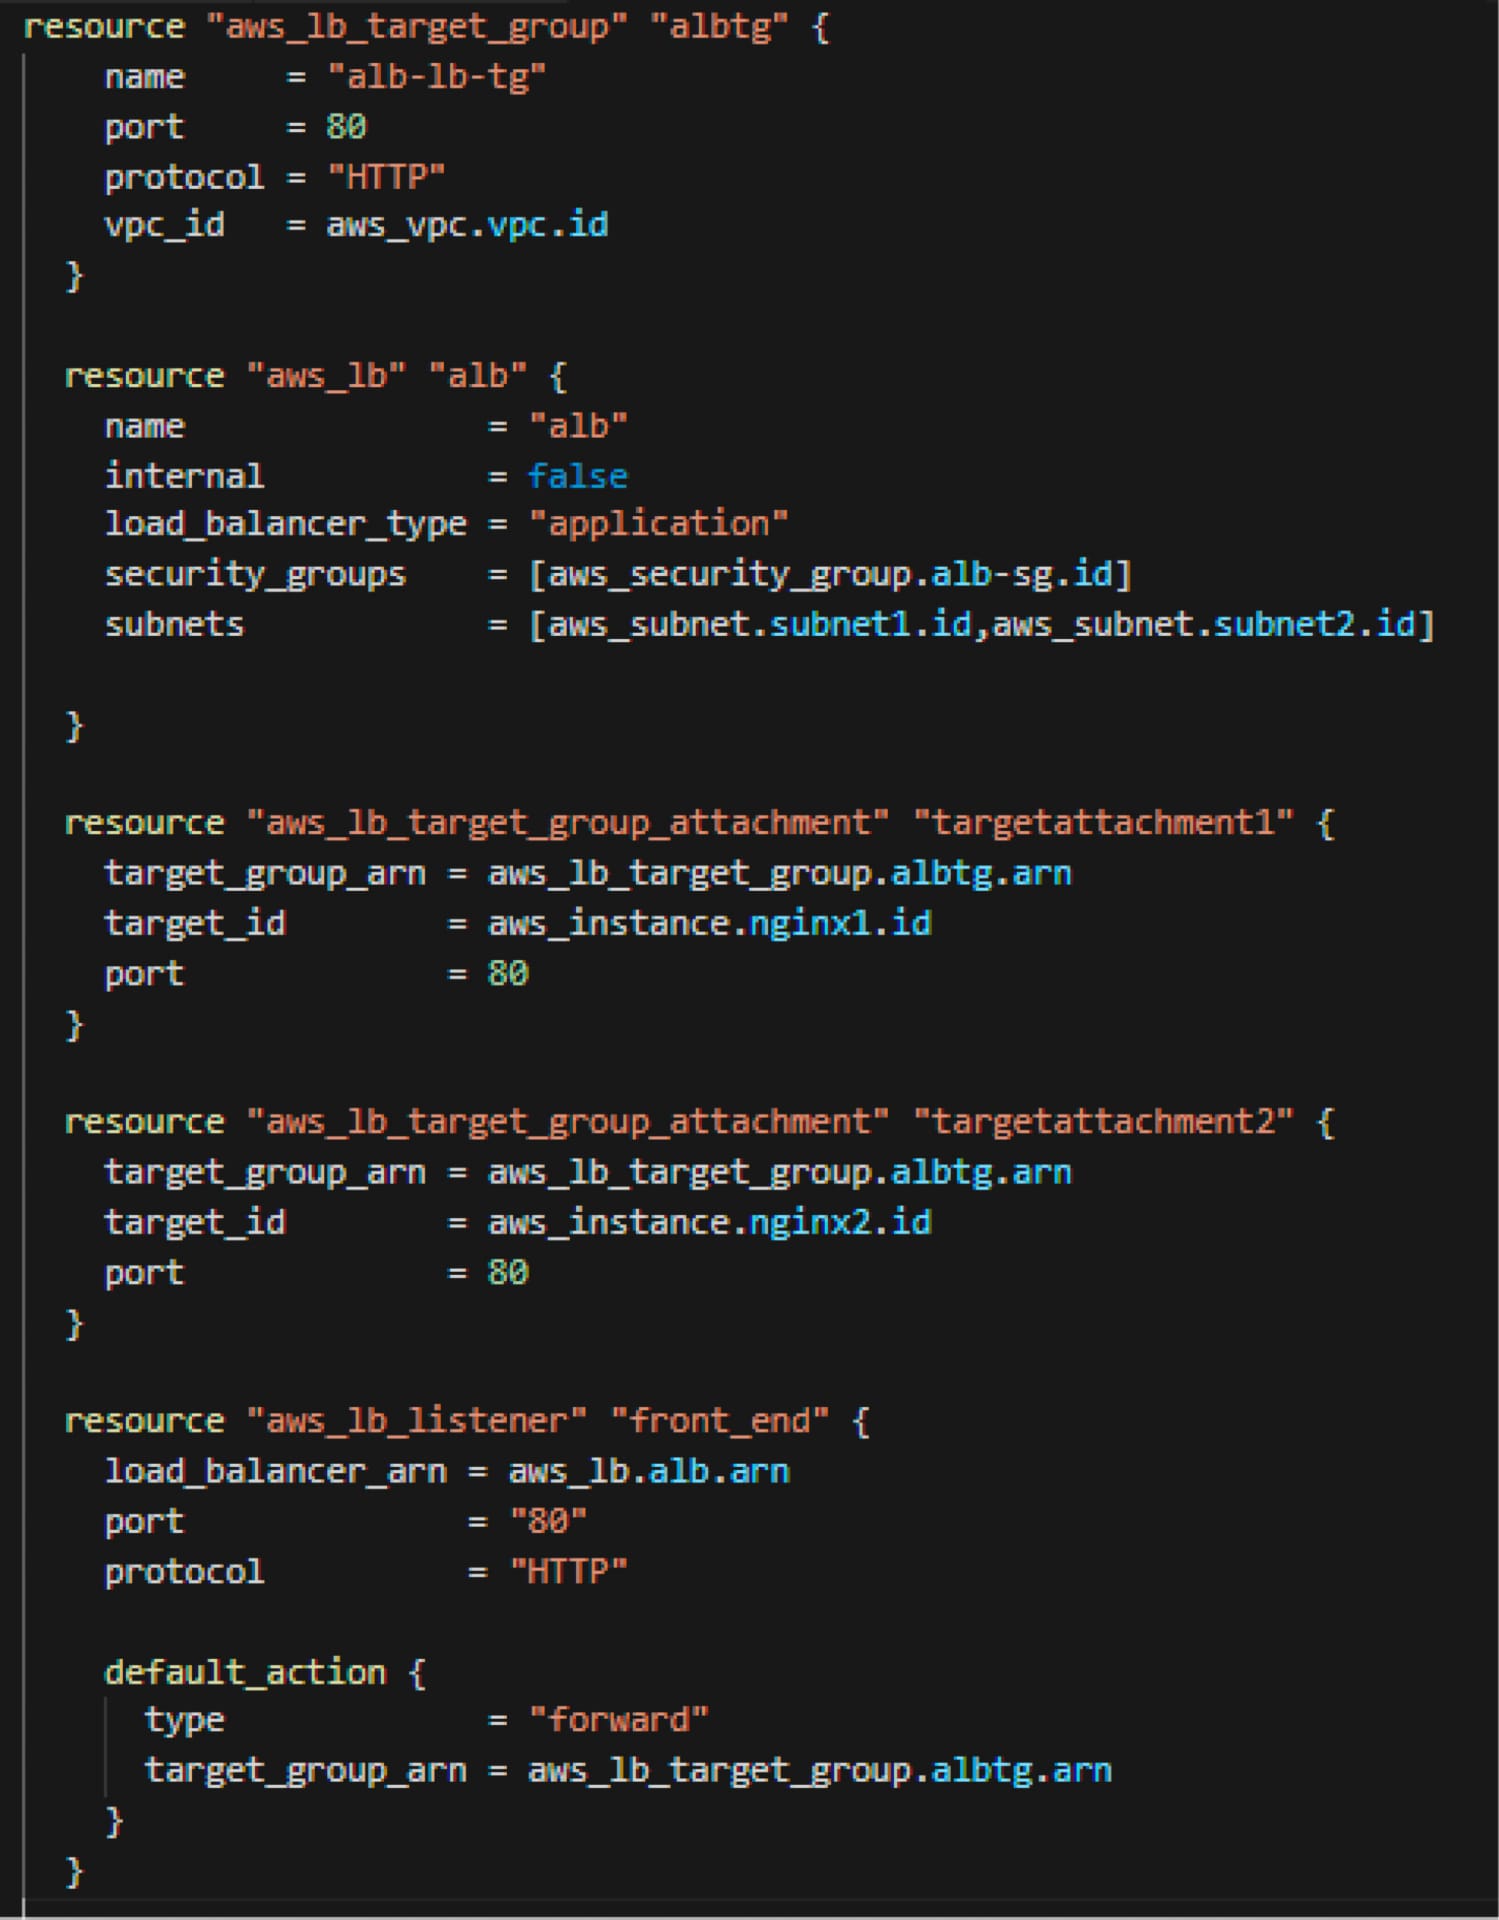
Load Balancer
Here, I am creating a public-facing load balancer spread over the two subnets, the load balancer security group attached to this load balancer, and a listener for port 80. Finally, I am creating a target group encompassing the two NGINX servers.
NGINX Servers
The information below shows only one NGINX server, but I am doing the same block twice for the second NGINX server, while changing the names (to protect the innocent) to reflect the second server.
The easily understandable part for most of you:
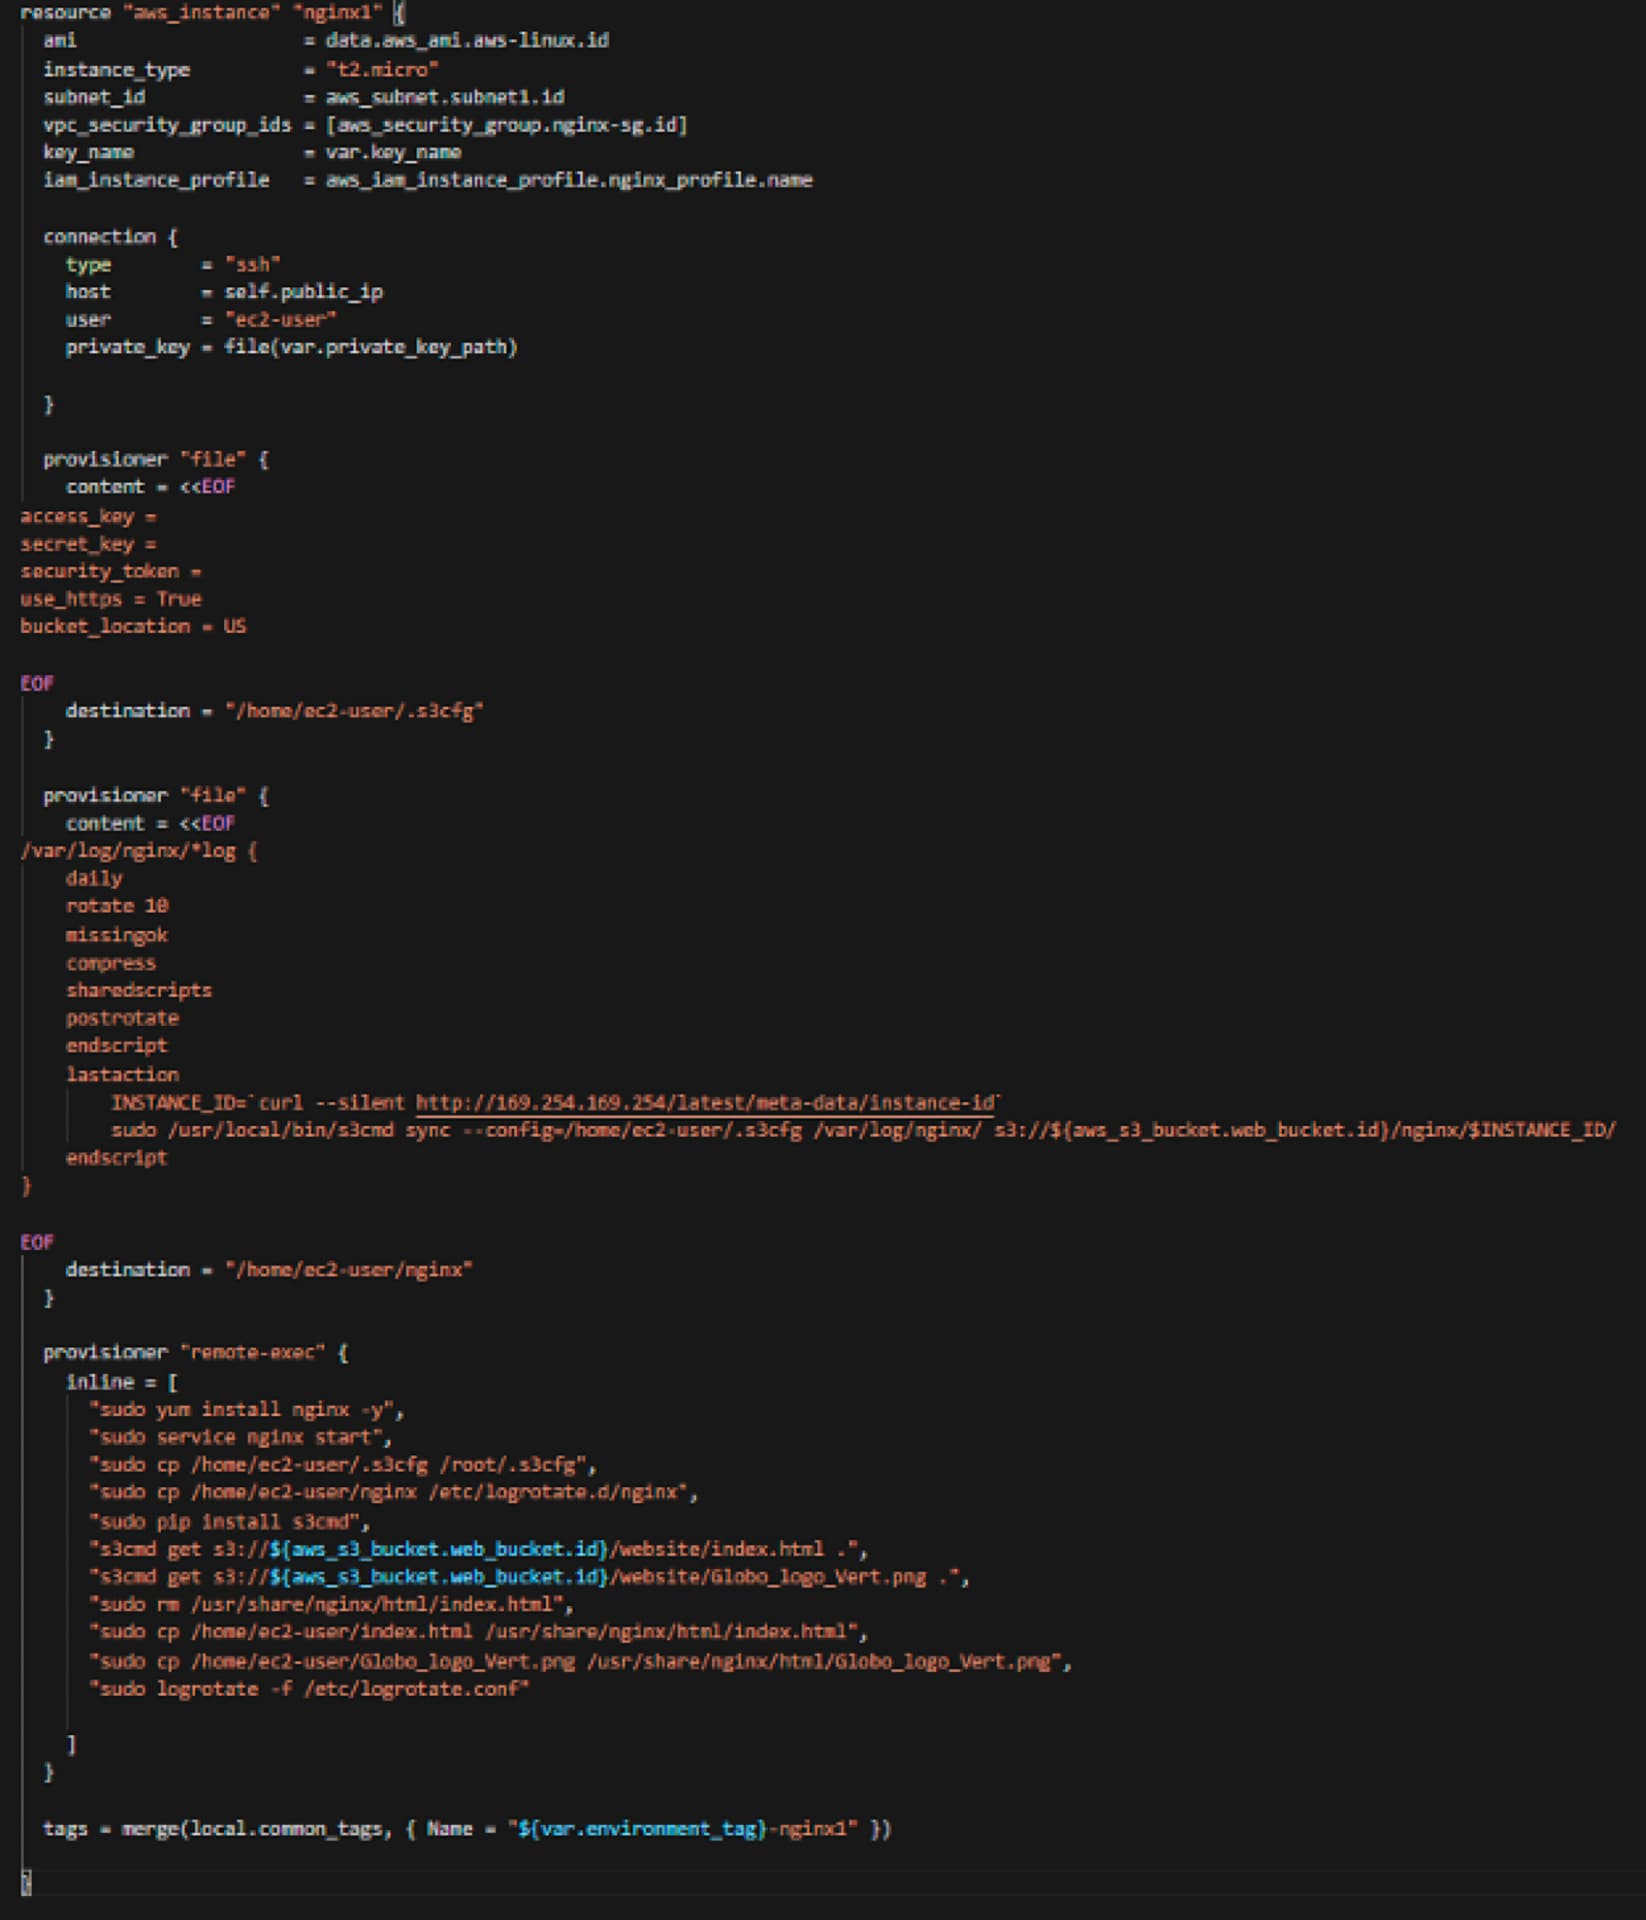
- I am creating one of the two servers by calling the AMI from the data portion of the code. I am using a t2.micro EC2 instance and placing it in the first subnet. I am also attaching the NGINX security group that I defined earlier. This EC2 instance will be available to SSH from my home address and using my key pair. Furthermore, the EC2 instance will have an EC2 role that allows access to the S3 bucket for write and read permissions.
The not so easily understandable part (at least for me when I started in Terraform):
- In the first file provisioner block, I am writing a file to the EC2 instance for the s3cfg file as the s3cmd (and in turn s3cfg) is what EC2 will use to pull the html files from S3 (remember the EC2 role?), as well as push the log files to S3.
- In the second file provisioner block, I am configuring the NGINX log rotation and having it send the data over to S3 (for long term retention and analysis) and creating a folder in S3 with a name of the instance ID of the EC2 that I am getting from the metadata that runs on all EC2 instances
- In the third remote exec block, I am installing NGINX and s3cmd. And I am configuring NGINX by:
- removing the default index.html and replacing it with the html file in the s3 bucket we uploaded (later down in the code)
- copying over the png file (again from s3 bucket via Terraform upload to s3 later in the code)
both files, by default, are put into the ec2-user home directory since we used the ec2-user to login remotely via Terraform with our keypair, hence the code snippet where it copies it from the ec2-user directory to the final default destination where NGINX is looking for the index.html file.
I am configuring the NGINX log rotation:
S3
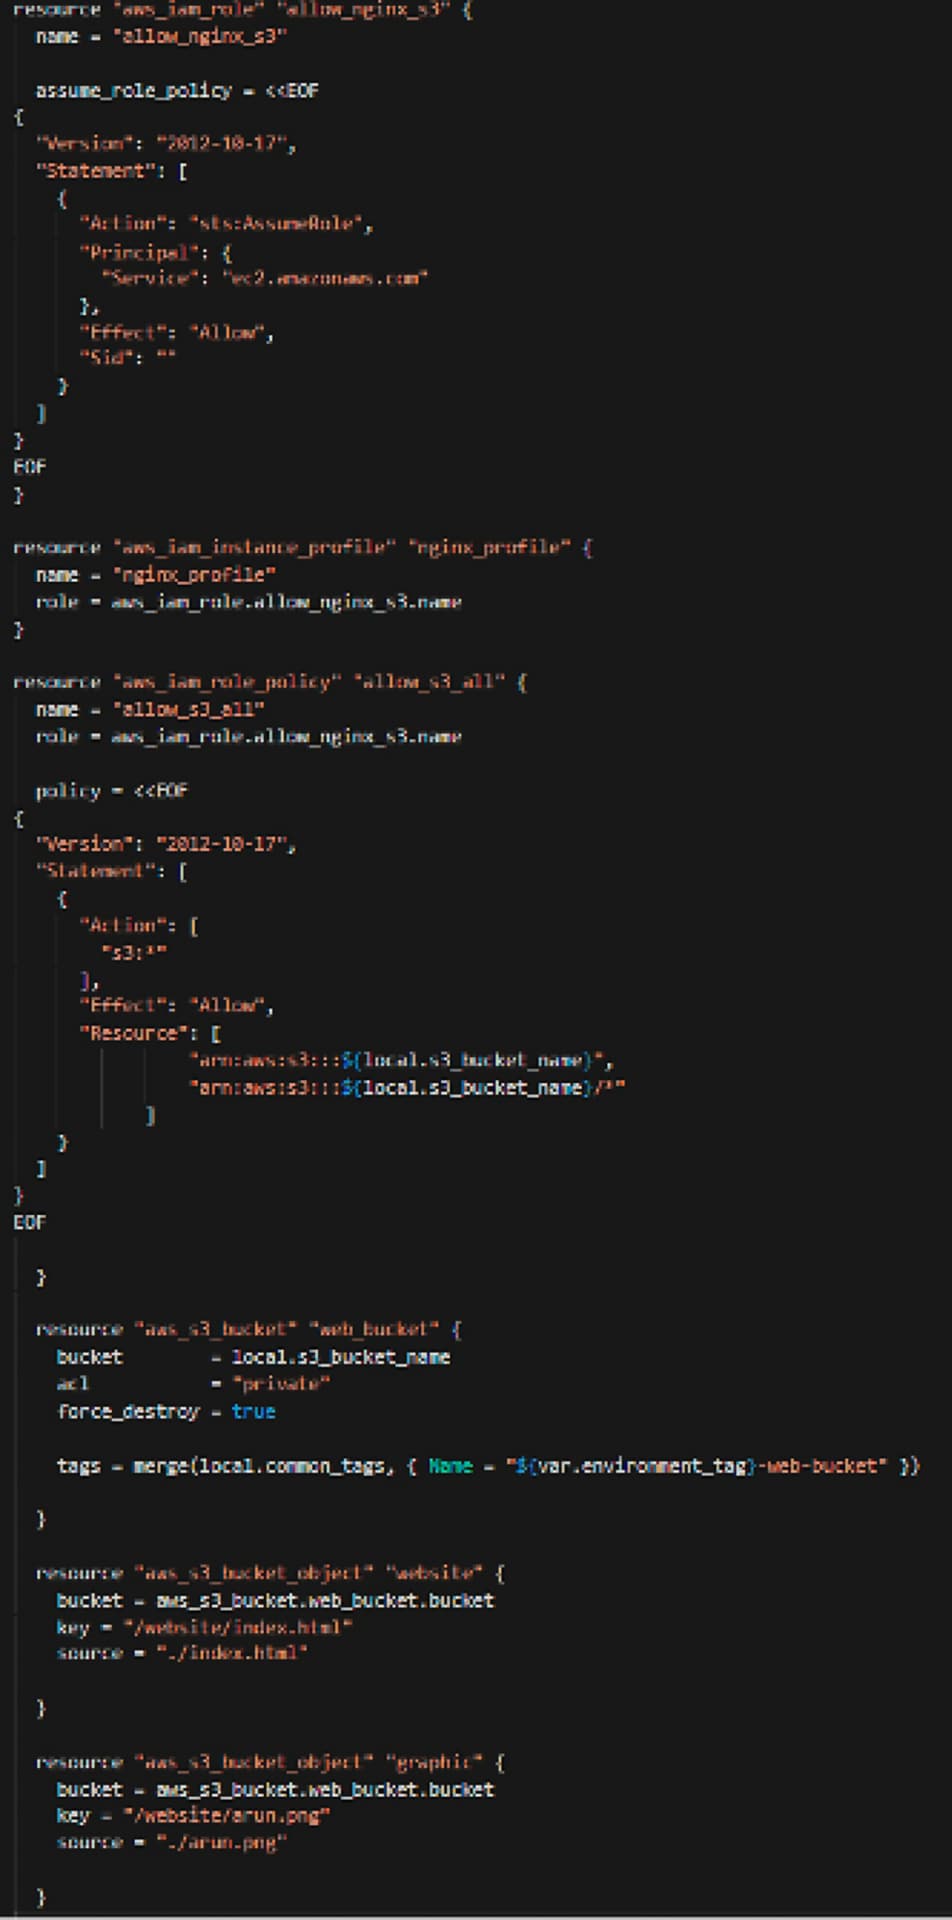
For the S3 portion of this adventure, I have to do a few items:
- Create a role for EC2 to access the S3 bucket (we don’t have to leave it open for anyone outside of the EC2 to get to the S3 bucket)
- Create an EC2 instance profile to use the role from above
- Create the S3 bucket and make it private (not public-facing or public access)
- Upload the index.html and png file to the s3 bucket so that the EC2 instances can pull from to use in NGINX
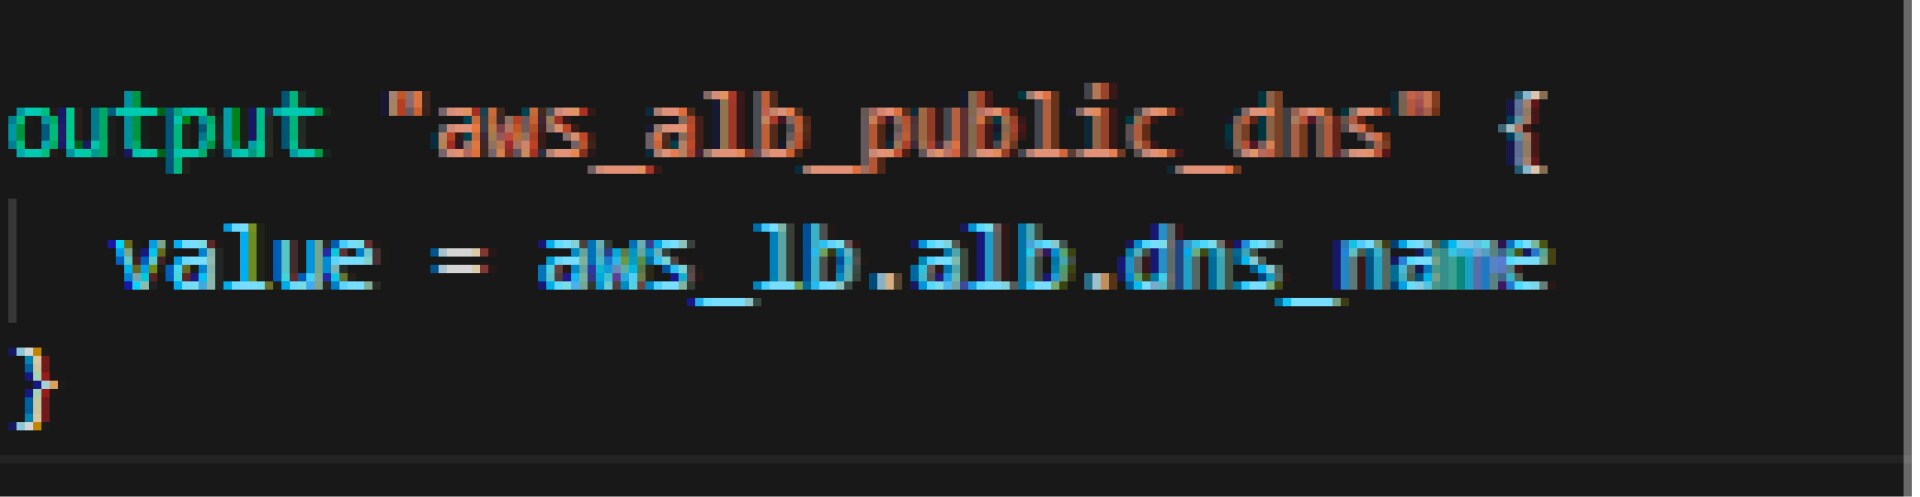
Output
Finally, we have the output, which will provide us the DNS name of the load balancer that the public can connect to.
Run the Code
For those that are familiar with Terraform, once the code has been built, you know what you have to do.
But for those of you that are learning, once the code is built out you will have to run the code to:
- Make sure you got it all right and with zero errors
- Bring your dreams to reality by actually creating the objects in AWS
Terraform Commands
terraform init:
The Terraform deployment process follows a cycle, and the first thing we need to do (because this example is using AWS) is get the AWS provider plugin. We do that by running ‘terraform init.’ This command initializes our configuration by looking at the configuration file. During this recon mission, Terraform sees that we're using the AWS provider, and then downloads that plugin if it doesn't already have it.
terraform plan -out myplan.plan:
The next step in the Terraform process is to run terraform plan. Terraform plan will look at the configuration files that are in the current working directory and will also load the variables if it finds a tfvars file in that directory. We also want to specify a file in which to store this plan hence the ― out portion along with the plan name (I called it myplan.plan).
This file, myplan.plan, tells Terraform to reference it when the resource creation step is called. When running Terraform plan, Terraform takes a look at your existing environment, looks at what you want to do in your configuration (desired goal), and then figures out what it needs to do to make reality match your desired goal. Running this step will provide a slew of information on the resources that will be touched, ending with the quantity of resources that will be added (green plus sign), modified (yellow tilde sign), and/or deleted (red minus sign).
The great thing about the plan step is it tells you exactly what it's going to do before it does it, and that's very important for when you're updating a configuration. There are times when you know there isn’t anything that will cause any issues (for example, a net new environment) and you want to bypass this step and go directly to creation of resources without any user intervention, but for the most part this step is your warning label.
terraform apply myplan.plan:
The plan step will also provide any errors it may have caught due to typos or misconfigurations. The next thing to do is to actually create the resources in AWS. We run terraform apply and give it that plan file that we got as output from the plan command (myplan.plan). This time, rather than going out and seeing what's there and planning out what it's going to do, now Terraform is actually executing on what is in the plan. Once more, a warning shot is executed by Terraform asking if you are really, really, really sure you want to do this.
terraform destroy:
If you ever want to remove all the resources once you are done with them, this command will run through the tfstate file (where Terraform keeps a record of the resources built), and once you give the green light, will destroy all the resources you created.
Conclusion
In this post, we were able to use Terraform to create a configuration file that allowed us to connect to AWS, create our network and supporting cast, create a couple of EC2 instances to act as web servers that sat behind a load balancer, and pulled website files from a S3 bucket that we created and populated, also from the Terraform configuration file.
Of course, there are other ways, as well as other tools, that can work in parallel with Terraform to achieve the same thing (the way I make my favorite dinner dish is definitely different compared to mom’s way, which is different compared to my grandmother’s way). However, I hope this post helps those that are new to Terraform and/or those that are looking for the rinse and repeatability of the final goal rather than executing tons and tons of keyboard and mouse clicks using the UI or CLI.
################################################################################## # VARIABLES ##################################################################################
variable "aws_access_key" {} variable "aws_secret_key" {} variable "private_key_path" {} variable "key_name" {} variable "region" { default = "us-east-1" } variable "network_address_space" { default = "10.1.0.0/16" } variable "subnet1_address_space" { default = "10.1.0.0/24" } variable "subnet2_address_space" { default = "10.1.1.0/24" } variable "bucket_name_prefix" {} variable "billing_code_tag" {} variable "environment_tag" {} |
################################################################################## # PROVIDERS ##################################################################################
provider "aws" { access_key = var.aws_access_key secret_key = var.aws_secret_key region = var.region } |
################################################################################## # LOCALS ##################################################################################
locals { common_tags = { BillingCode = var.billing_code_tag Environment = var.environment_tag }
s3_bucket_name = "${var.bucket_name_prefix}-${var.environment_tag}-${random_integer.rand.result}" } |
################################################################################## # DATA ##################################################################################
data "aws_availability_zones" "available" {}
data "aws_ami" "aws-linux" { most_recent = true owners = ["amazon"]
filter { name = "name" values = ["amzn-ami-hvm*"] }
filter { name = "root-device-type" values = ["ebs"] }
filter { name = "virtualization-type" values = ["hvm"] } } |
################################################################################## # RESOURCES ##################################################################################
#Random ID resource "random_integer" "rand" { min = 100 max = 999 }
# NETWORKING # resource "aws_vpc" "vpc" { cidr_block = var.network_address_space
tags = merge(local.common_tags, { Name = "${var.environment_tag}-vpc" }) }
resource "aws_internet_gateway" "igw" { vpc_id = aws_vpc.vpc.id
tags = merge(local.common_tags, { Name = "${var.environment_tag}-igw" })
}
resource "aws_subnet" "subnet1" { cidr_block = var.subnet1_address_space vpc_id = aws_vpc.vpc.id map_public_ip_on_launch = "true" availability_zone = data.aws_availability_zones.available.names[0]
tags = merge(local.common_tags, { Name = "${var.environment_tag}-subnet1" })
}
resource "aws_subnet" "subnet2" { cidr_block = var.subnet2_address_space vpc_id = aws_vpc.vpc.id map_public_ip_on_launch = "true" availability_zone = data.aws_availability_zones.available.names[1]
tags = merge(local.common_tags, { Name = "${var.environment_tag}-subnet2" })
}
# ROUTING # resource "aws_route_table" "rtb" { vpc_id = aws_vpc.vpc.id
route { cidr_block = "0.0.0.0/0" gateway_id = aws_internet_gateway.igw.id }
tags = merge(local.common_tags, { Name = "${var.environment_tag}-rtb" })
}
resource "aws_route_table_association" "rta-subnet1" { subnet_id = aws_subnet.subnet1.id route_table_id = aws_route_table.rtb.id }
resource "aws_route_table_association" "rta-subnet2" { subnet_id = aws_subnet.subnet2.id route_table_id = aws_route_table.rtb.id }
# SECURITY GROUPS # resource "aws_security_group" "alb-sg" { name = "nginx_elb_sg" vpc_id = aws_vpc.vpc.id
#Allow HTTP from anywhere ingress { from_port = 80 to_port = 80 protocol = "tcp" cidr_blocks = ["0.0.0.0/0"] }
#allow all outbound egress { from_port = 0 to_port = 0 protocol = "-1" cidr_blocks = ["0.0.0.0/0"] }
tags = merge(local.common_tags, { Name = "${var.environment_tag}-alb" })
}
# Nginx security group resource "aws_security_group" "nginx-sg" { name = "nginx_sg" vpc_id = aws_vpc.vpc.id
# SSH access from anywhere ingress { from_port = 22 to_port = 22 protocol = "tcp" cidr_blocks = ["0.0.0.0/0"] }
# HTTP access from the VPC ingress { from_port = 80 to_port = 80 protocol = "tcp" cidr_blocks = [var.network_address_space] }
# outbound internet access egress { from_port = 0 to_port = 0 protocol = "-1" cidr_blocks = ["0.0.0.0/0"] }
tags = merge(local.common_tags, { Name = "${var.environment_tag}-nginx" })
}
# LOAD BALANCER #
resource "aws_lb_target_group" "albtg" { name = "alb-lb-tg" port = 80 protocol = "HTTP" vpc_id = aws_vpc.vpc.id }
resource "aws_lb" "alb" { name = "alb" internal = false load_balancer_type = "application" security_groups = [aws_security_group.alb-sg.id] subnets = [aws_subnet.subnet1.id,aws_subnet.subnet2.id]
}
resource "aws_lb_target_group_attachment" "targetattachment1" { target_group_arn = aws_lb_target_group.albtg.arn target_id = aws_instance.nginx1.id port = 80 }
resource "aws_lb_target_group_attachment" "targetattachment2" { target_group_arn = aws_lb_target_group.albtg.arn target_id = aws_instance.nginx2.id port = 80 }
resource "aws_lb_listener" "front_end" { load_balancer_arn = aws_lb.alb.arn port = "80" protocol = "HTTP"
default_action { type = "forward" target_group_arn = aws_lb_target_group.albtg.arn } }
# INSTANCES # resource "aws_instance" "nginx1" { ami = data.aws_ami.aws-linux.id instance_type = "t2.micro" subnet_id = aws_subnet.subnet1.id vpc_security_group_ids = [aws_security_group.nginx-sg.id] key_name = var.key_name iam_instance_profile = aws_iam_instance_profile.nginx_profile.name
connection { type = "ssh" host = self.public_ip user = "ec2-user" private_key = file(var.private_key_path)
}
provisioner "file" { content = <<EOF access_key = secret_key = security_token = use_https = True bucket_location = US
EOF destination = "/home/ec2-user/.s3cfg" }
provisioner "file" { content = <<EOF /var/log/nginx/*log { daily rotate 10 missingok compress sharedscripts postrotate endscript lastaction INSTANCE_ID=`curl --silent http://169.254.169.254/latest/meta-data/instance-id` sudo /usr/local/bin/s3cmd sync --config=/home/ec2-user/.s3cfg /var/log/nginx/ s3://${aws_s3_bucket.web_bucket.id}/nginx/$INSTANCE_ID/ endscript }
EOF destination = "/home/ec2-user/nginx" }
provisioner "remote-exec" { inline = [ "sudo yum install nginx -y", "sudo service nginx start", "sudo cp /home/ec2-user/.s3cfg /root/.s3cfg", "sudo cp /home/ec2-user/nginx /etc/logrotate.d/nginx", "sudo pip install s3cmd", "s3cmd get s3://${aws_s3_bucket.web_bucket.id}/website/index.html .", "s3cmd get s3://${aws_s3_bucket.web_bucket.id}/website/arun.png .", "sudo rm /usr/share/nginx/html/index.html", "sudo cp /home/ec2-user/index.html /usr/share/nginx/html/index.html", "sudo cp /home/ec2-user/arun.png /usr/share/nginx/html/arun.png", "sudo logrotate -f /etc/logrotate.conf"
] }
tags = merge(local.common_tags, { Name = "${var.environment_tag}-nginx1" })
}
resource "aws_instance" "nginx2" { ami = data.aws_ami.aws-linux.id instance_type = "t2.micro" subnet_id = aws_subnet.subnet2.id vpc_security_group_ids = [aws_security_group.nginx-sg.id] key_name = var.key_name iam_instance_profile = aws_iam_instance_profile.nginx_profile.name
connection { type = "ssh" host = self.public_ip user = "ec2-user" private_key = file(var.private_key_path)
}
provisioner "file" { content = <<EOF access_key = secret_key = security_token = use_https = True bucket_location = US
EOF destination = "/home/ec2-user/.s3cfg" }
provisioner "file" { content = <<EOF /var/log/nginx/*log { daily rotate 10 missingok compress sharedscripts postrotate endscript lastaction INSTANCE_ID=`curl --silent http://169.254.169.254/latest/meta-data/instance-id` sudo /usr/local/bin/s3cmd sync --config=/home/ec2-user/.s3cfg /var/log/nginx/ s3://${aws_s3_bucket.web_bucket.id}/nginx/$INSTANCE_ID/ endscript }
EOF destination = "/home/ec2-user/nginx" }
provisioner "remote-exec" { inline = [ "sudo yum install nginx -y", "sudo service nginx start", "sudo cp /home/ec2-user/.s3cfg /root/.s3cfg", "sudo cp /home/ec2-user/nginx /etc/logrotate.d/nginx", "sudo pip install s3cmd", "s3cmd get s3://${aws_s3_bucket.web_bucket.id}/website/index.html .", "s3cmd get s3://${aws_s3_bucket.web_bucket.id}/website/arun.png .", "sudo rm /usr/share/nginx/html/index.html", "sudo cp /home/ec2-user/index.html /usr/share/nginx/html/index.html", "sudo cp /home/ec2-user/arun.png /usr/share/nginx/html/arun.png", "sudo logrotate -f /etc/logrotate.conf"
] }
tags = merge(local.common_tags, { Name = "${var.environment_tag}-nginx2" })
}
# S3 Bucket config# resource "aws_iam_role" "allow_nginx_s3" { name = "allow_nginx_s3"
assume_role_policy = <<EOF { "Version": "2012-10-17", "Statement": [ { "Action": "sts:AssumeRole", "Principal": { "Service": "ec2.amazonaws.com" }, "Effect": "Allow", "Sid": "" } ] } EOF }
resource "aws_iam_instance_profile" "nginx_profile" { name = "nginx_profile" role = aws_iam_role.allow_nginx_s3.name }
resource "aws_iam_role_policy" "allow_s3_all" { name = "allow_s3_all" role = aws_iam_role.allow_nginx_s3.name
policy = <<EOF { "Version": "2012-10-17", "Statement": [ { "Action": [ "s3:*" ], "Effect": "Allow", "Resource": [ "arn:aws:s3:::${local.s3_bucket_name}", "arn:aws:s3:::${local.s3_bucket_name}/*" ] } ] } EOF
}
resource "aws_s3_bucket" "web_bucket" { bucket = local.s3_bucket_name acl = "private" force_destroy = true
tags = merge(local.common_tags, { Name = "${var.environment_tag}-web-bucket" })
}
resource "aws_s3_bucket_object" "website" { bucket = aws_s3_bucket.web_bucket.bucket key = "/website/index.html" source = "./index.html"
}
resource "aws_s3_bucket_object" "graphic" { bucket = aws_s3_bucket.web_bucket.bucket key = "/website/arun.png" source = "./arun.png"
} |
################################################################################## # OUTPUT ##################################################################################
output "aws_alb_public_dns" { value = aws_lb.alb.dns_name } |
Arun Daniel is a Sr. Consulting Engineer for Data Center and Cloud Services at CDW with more than 20 years of experience designing, deploying and managing all aspects of data center and cloud services. For the past 10 years, his primary focus has been migrations from on-premises data centers to Amazon Web Services. Arun holds numerous AWS certifications, as well as HashiCorp, Microsoft Azure, VMware and Cisco certifications.